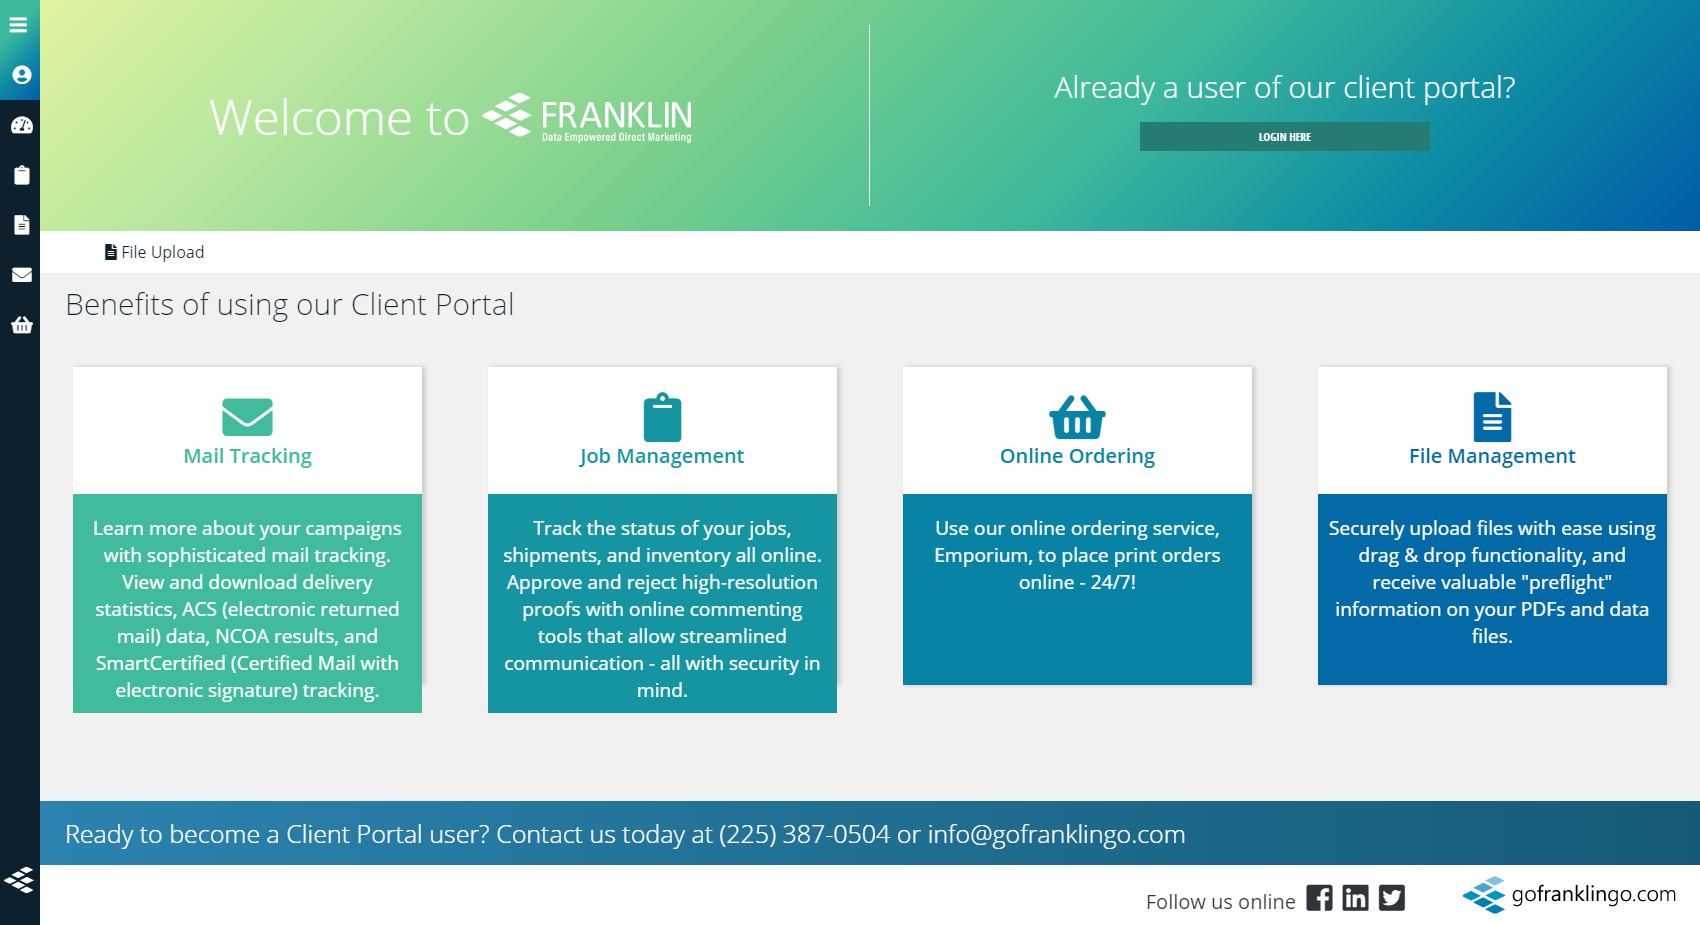
Welcome to the New Franklin Client Portal
Our client portal has been updated to include almost everything you need to check your jobs on the go! Learn more about your campaigns with sophisticated mail tracking. View and download delivery statistics, ACS (electronic returned mail) data, NCOA results, and SmartCertified (Certified Mail with electronic signature) tracking. Track the status of your jobs, shipments, and inventory all online. Approve and reject high-resolution proofs with online commenting tools that allow streamlined communication - all with security in mind. Use our online ordering service, Emporium, to place print orders online - 24/7! Securely upload with ease using drag & drop functionality and receive valuable "preflight" information on your PDFs and data files.
If you are having trouble navigating our new system, please review the information in this online document. Additionally, you can contact your sales executive or project manager for any questions.
Our new Client Portal was designed to make your experience as easy as possible for you, but we rely on feedback to make the experience even better. If you have any feedback or suggestions, please let us know.
Browser Compatibility
Please ensure you are using our client portal with the latest versions of Chrome, Firefox, Safari, Edge, or IE11. If your browser is not compatible you will be redirected to our browser error page.
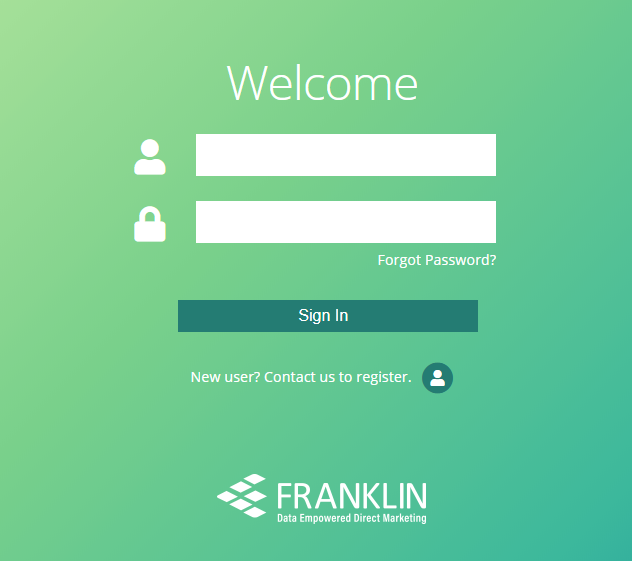
Logging In
To access the new client portal, go to portal.gofranklingo.com and click the Login Here button in the top right corner of the screen.
Enter your username (email address) and password into the designated fields. If you do not have credentials your sales executive or project manager can assist you in becoming a Client Portal user.
After clicking the Sign In button, you will be redirected back to the home page.
If you are logging in from another URL you may be redirected to a different page in the client portal.
Account Management
Access your account settings by clicking the icon to the left of your name. The account management screen allows you to change your name, email, address, or update your current password.
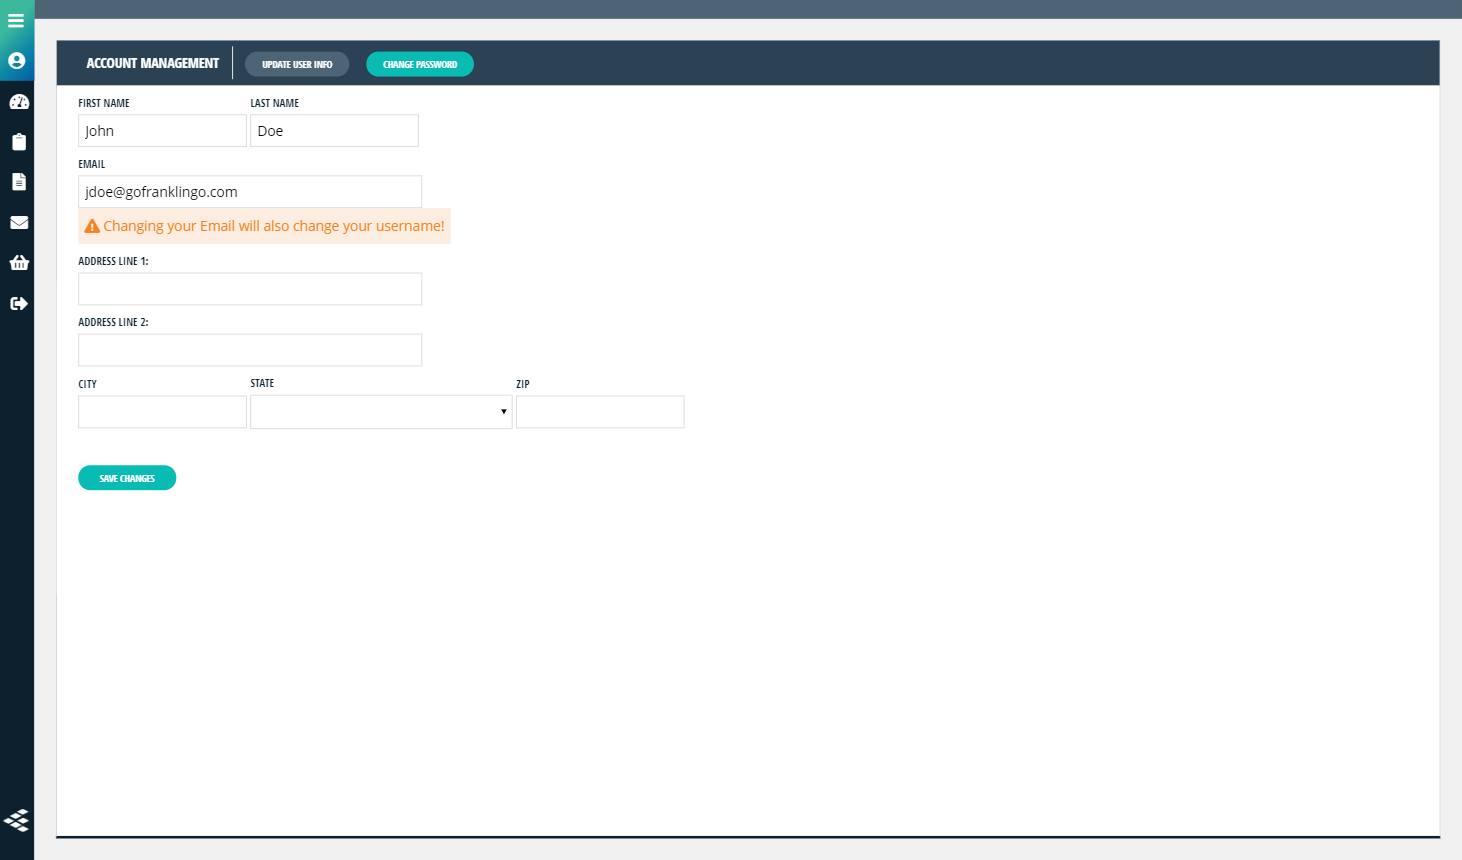
The Update User Info screen allows you to update your first and last name, email, and address.
Warning: Changing your email address will also change your username!
To update your password, click the Change Password button at the top of the page.
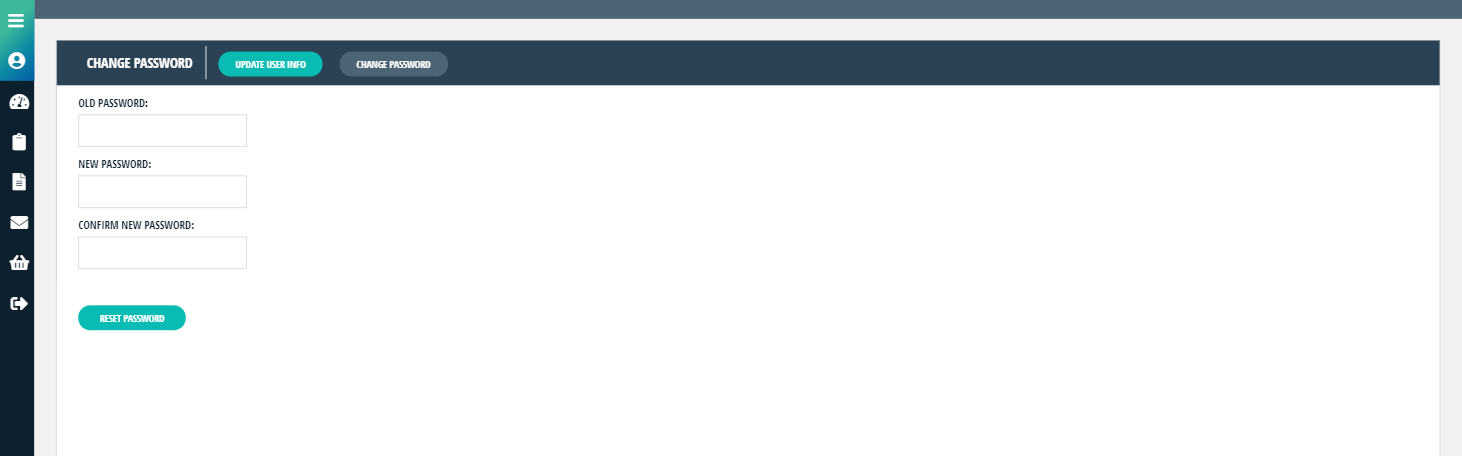
To change your password, type in your old password, your new password and confirm your new password then click Reset Password.
Your Dashboard
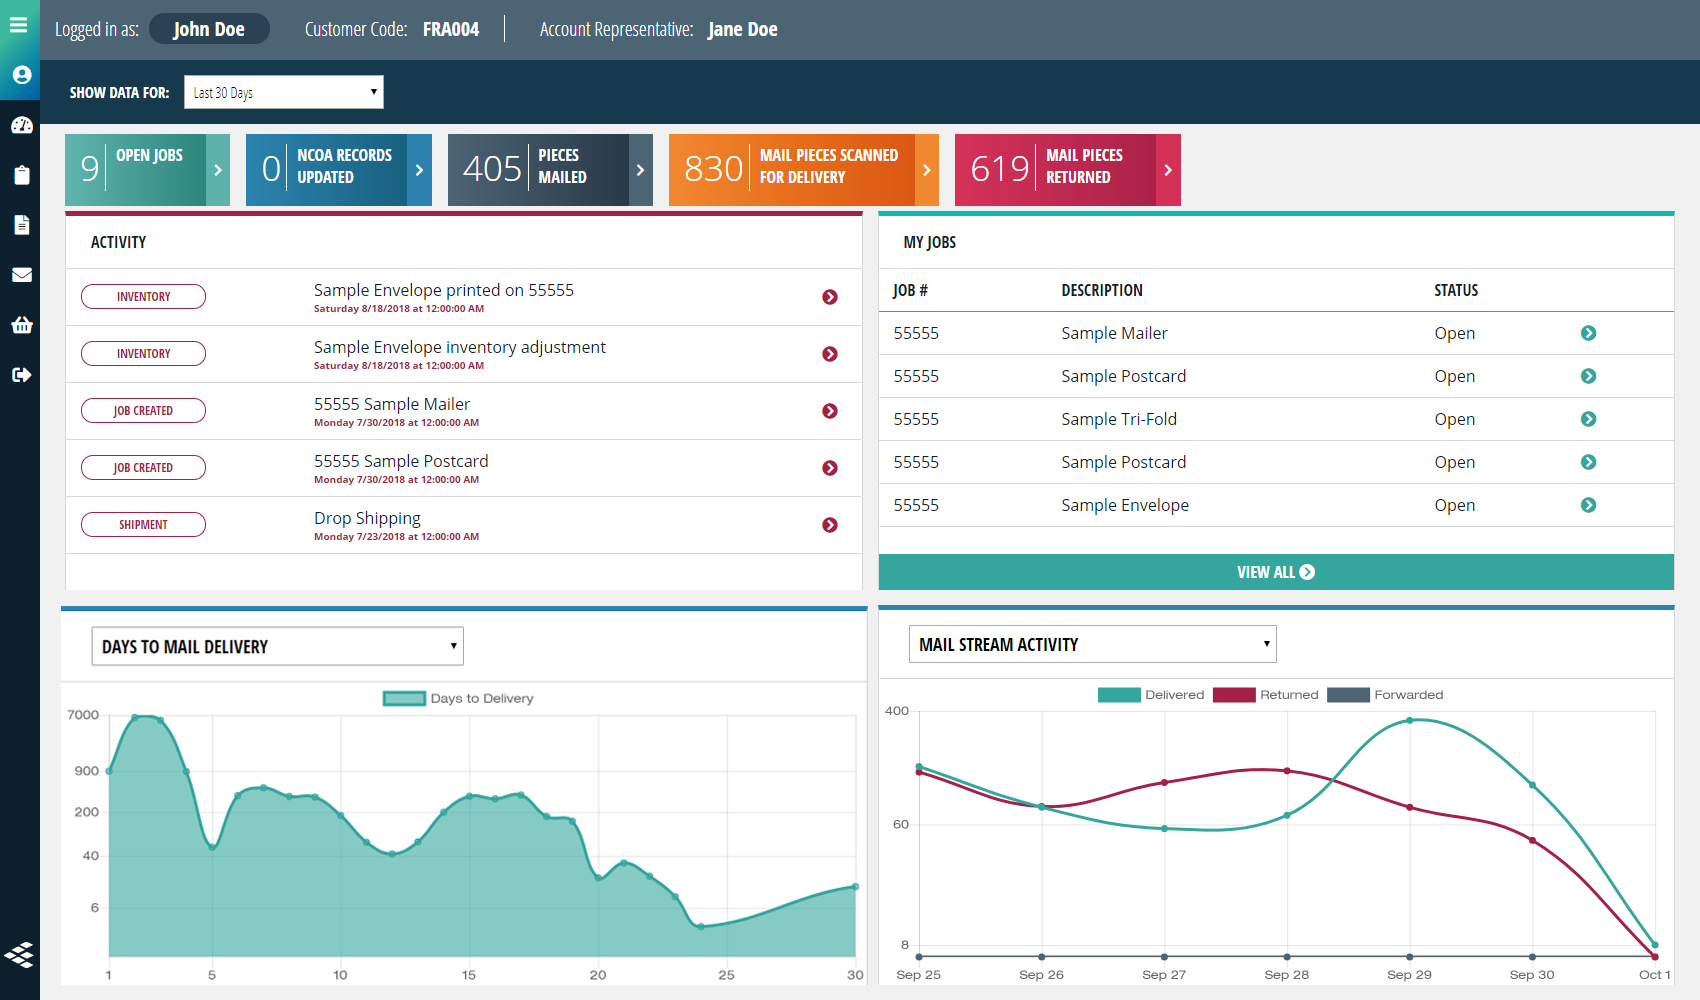
Access your personal dashboard by clicking the icon on the left navigation menu. Your dashboard shows an overall view of your jobs and mailing data from the last 30, 60, or 90 days.
At the top of the dashboard you will see your name, customer code, and your account executive. If you'd like to quickly email your account executive just click on their name.
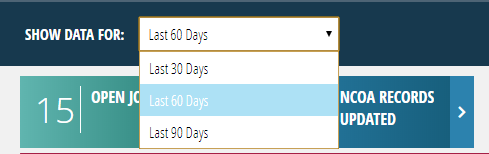
Change Data Time Frame
You can change the overall data information for the top bar, Days To Mail Delivery, and Mail Stream Activity. Select from 30, 60, or 90 days and the dashboard will reload to reflect your selection.
At A Glance
The top bar on the dashboard shows open jobs and mailing data at a glance. You can click on any of the arrows to take you to the associated details page.

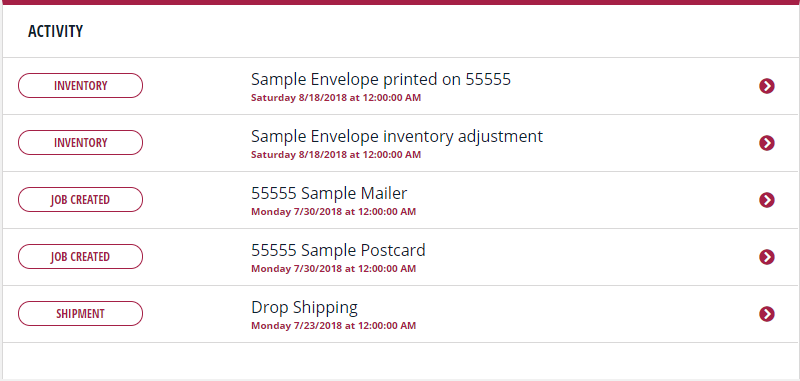
Activity Feed
The activity feed shows the most recent activity related to your account including mailing activity, shipment, and inventory information.
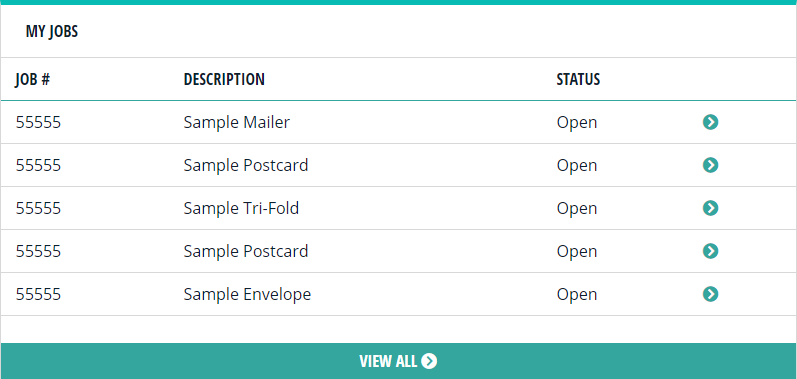
My Jobs
My Jobs shows the last five jobs that have been created. Clicking any of the arrows leads you to the Job Management page with its details expanded.
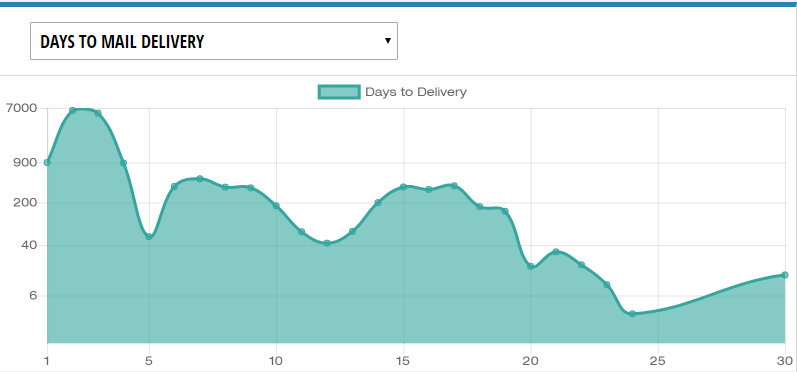
Days To Mail Delivery
The Days To Mail Delivery graph shows how many pieces and how long they took to deliver. You can view more detailed information by hovering over a dot on the graph.
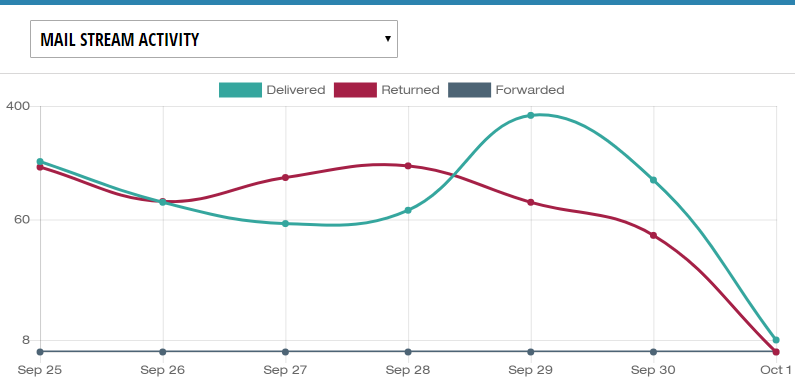
Mailstream Activity
The Mailstream Activity graph shows how many mail pieces have been delivered, returned, and forwarded over the selected time frame.
Job Management - Pending Proofs
Our online proofing portal gives you the power to review, annotate, and provide feedback directly from your computer or mobile device through our website. Automated email updates will keep you and your team up to date on the status of your projects. Tracking multiple projects is simple thanks to our management dashboard. There is no need for any additional programs or anything extra to install.
Proof Dashboard
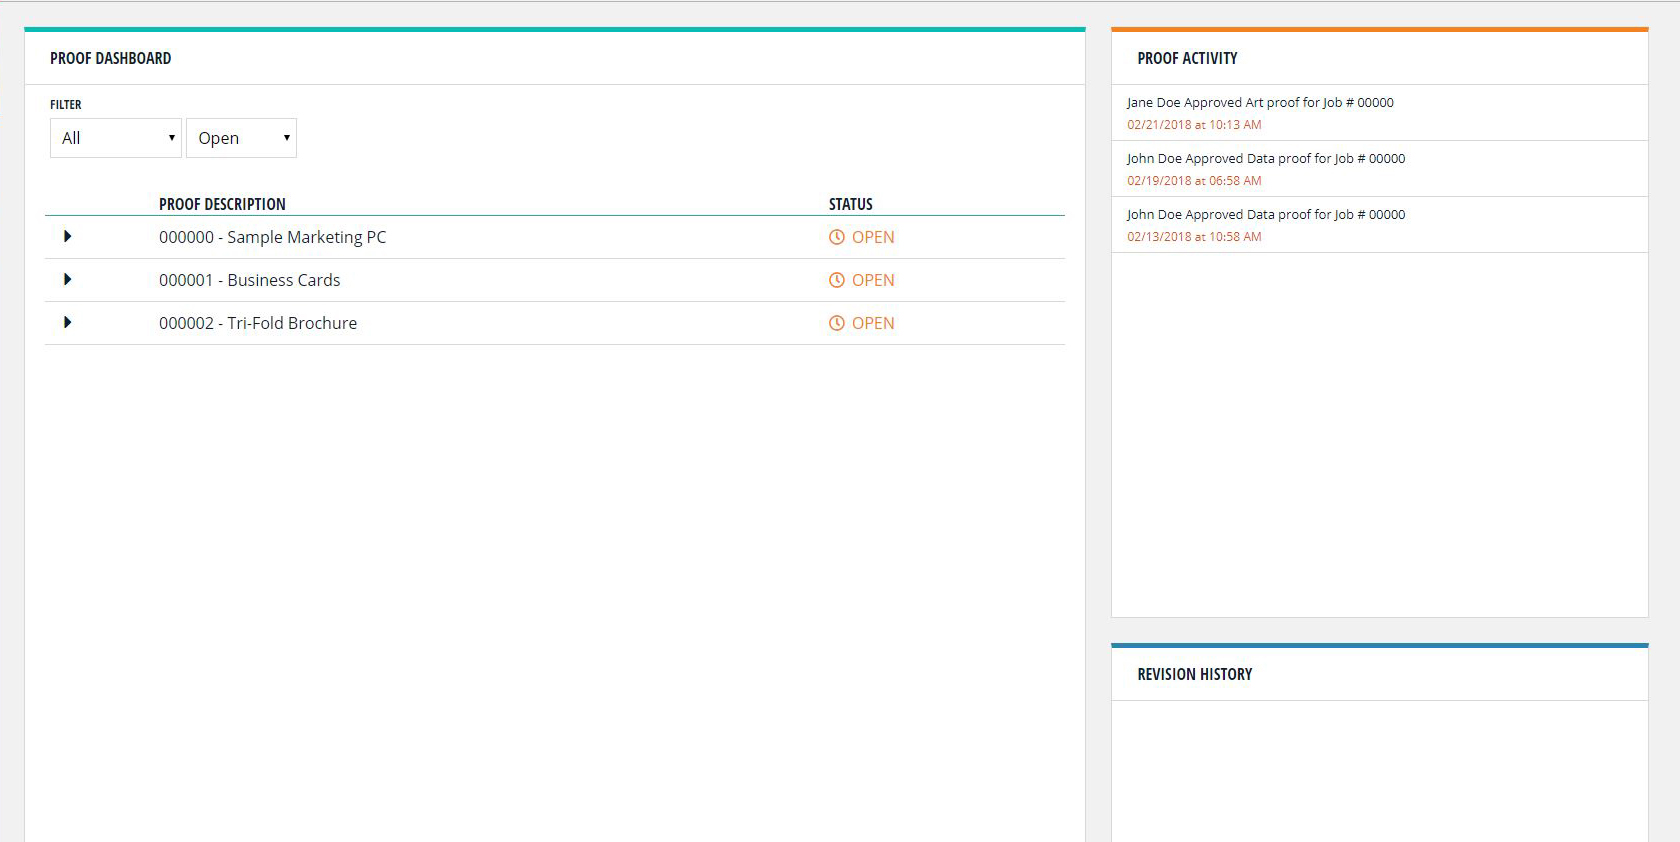
The proofing dashboard allows you to view your jobs at a glance with a list of your current proofs, recent activity feed, and revision history. You can access the dashboard at any time by clicking the Pending Proofs link below the Job Management in the navigation panel.
The left section of the proof dashboard lists your jobs along with their overall status. You can filter the list by time frame or status.
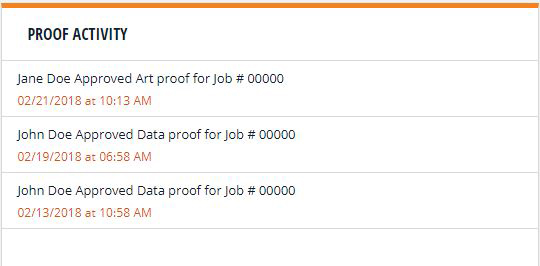
Proof activity allows you to see the most recent approvals and rejections relating to your jobs.
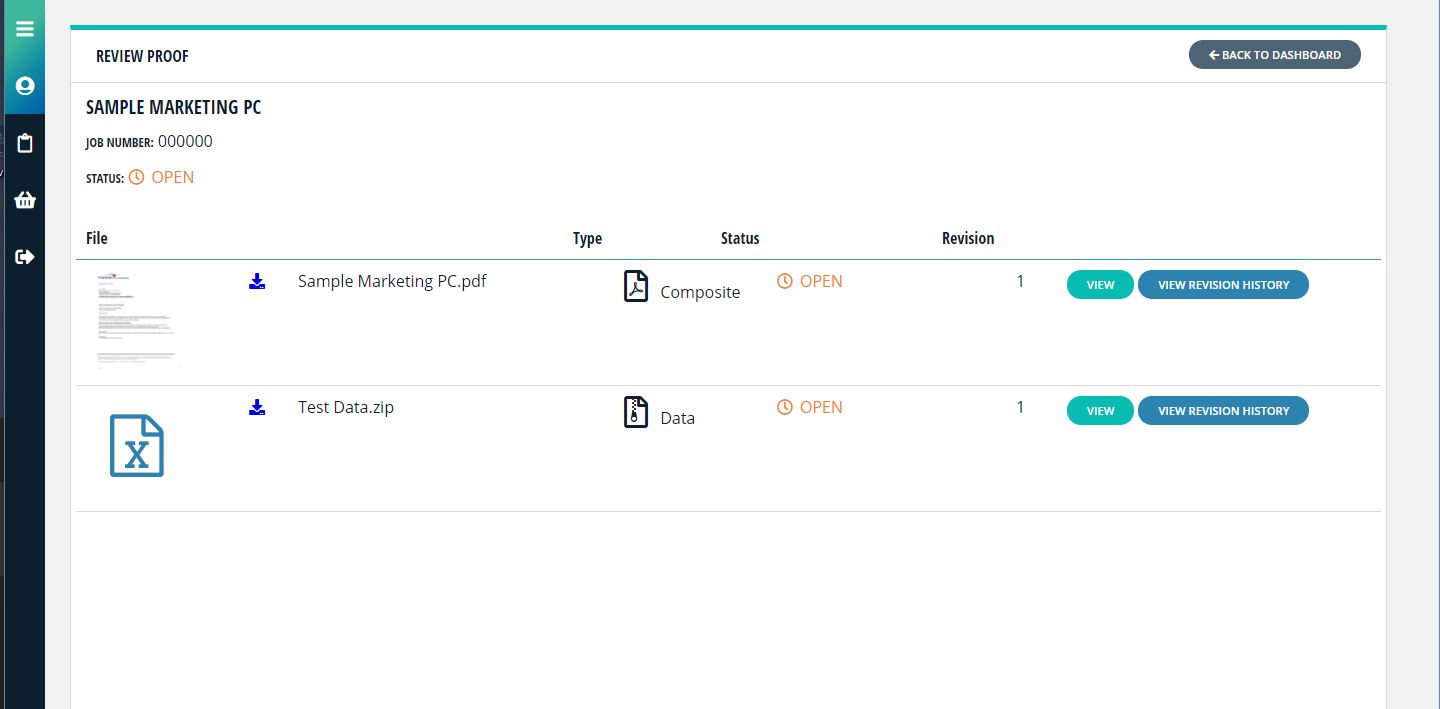
Proof Details
Each job contains a list of associated proofs that can be expanded by clicking the arrow to the left of the proof description. The expanded list shows the proof type and status along with the ability to view the proof or revision history.
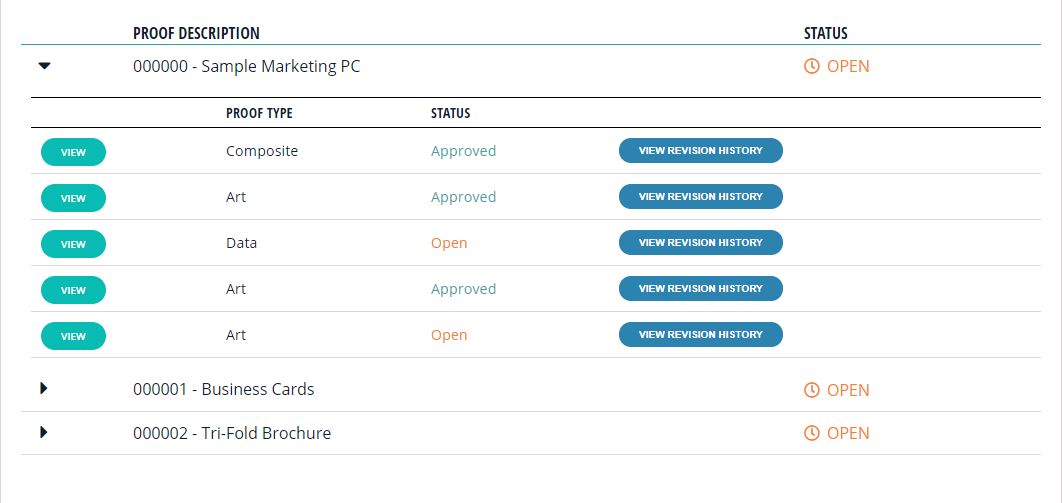
Click View to be directed to your proof file where you can approve or reject with annotations or click View Revision History to see the revision history of the selected proof in the bottom right corner of your proof dashboard.
Revision History & Approvers
Additional details about revisions and approval statuses can be viewed in the revision history panel.
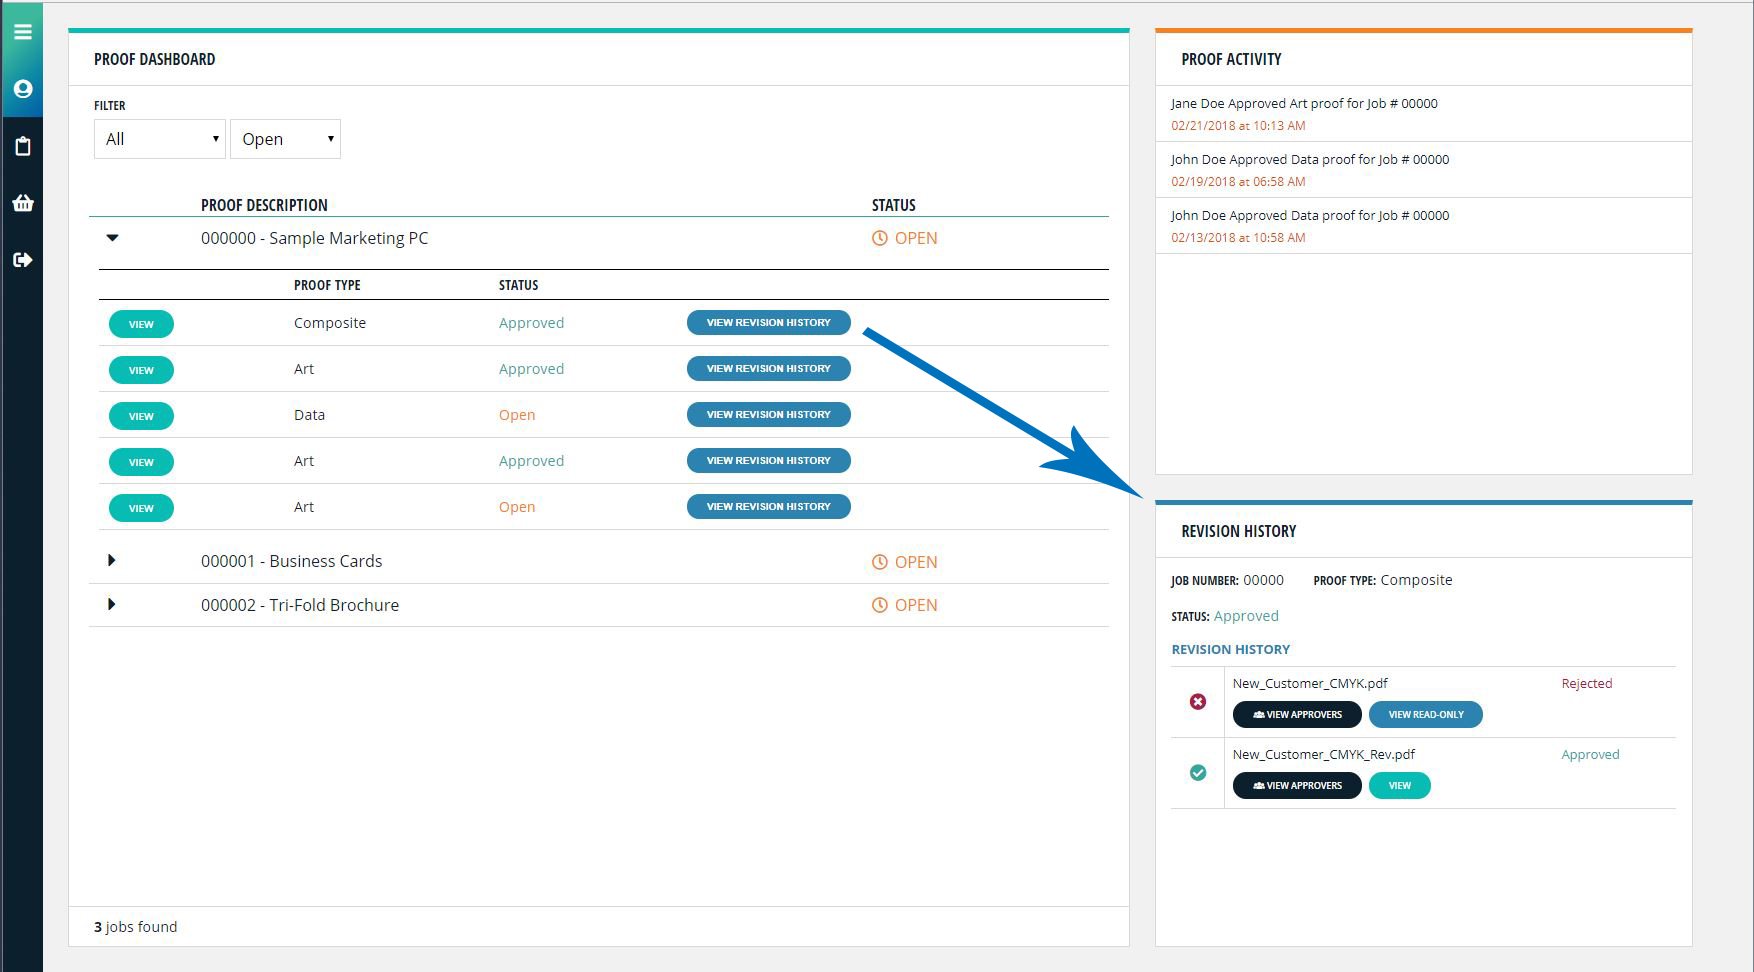
Revision History Panel
The revision history panel displays the job number, proof type, and status. The revision history of the selected proof will appear in the table beneath the job information along with the status and the ability to view approvers or the proof.
View - Takes you to the proof file.
View Read-Only - Takes you to the proof file but you will NOT have the ability to approve, reject, or make annotations - this option appears only when that revision has been approved or rejected.
View Approvers - Displays a pop-up window with approver status details regarding who is on the list of approvers, their status, and job information.

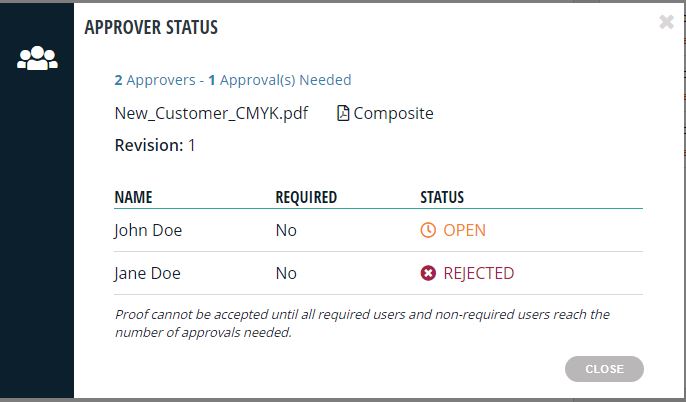
Approver Status
The approver status pop-up shows how many approvers have been assigned, how many are needed to consider the proof approved, file name, proof type, revision number, and the list of approvers. Each approver will have their own status. However, the proof cannot be accepted until it has been approved by all required users and enough non-required users reach the number of approvals needed.
Proof Landing Page
Proof PDFs and data files, such as exposures and removals, can be viewed, downloaded, and approved or rejected. At the top of the page you will see the proof description, job number, and the overall status. Below that you will see the files associated with your proof along with the buttons to view or download the file and view revision history.
We encourage you to try our online PDF viewer which offers powerful annotation tools. Similarly, you can review all of your data proofing materials directly on the web.
- Download the file directly to your computer or mobile device.
View - You will be directed to your proof file where you can approve or reject with annotations.
View Revision History - You can view previous revisions with annotations.
View & Annotate PDF Proofs
To view a PDF proof, click the View button from the Proof Landing page or your Dashboard or the thumbnail on the Proof Landing page.
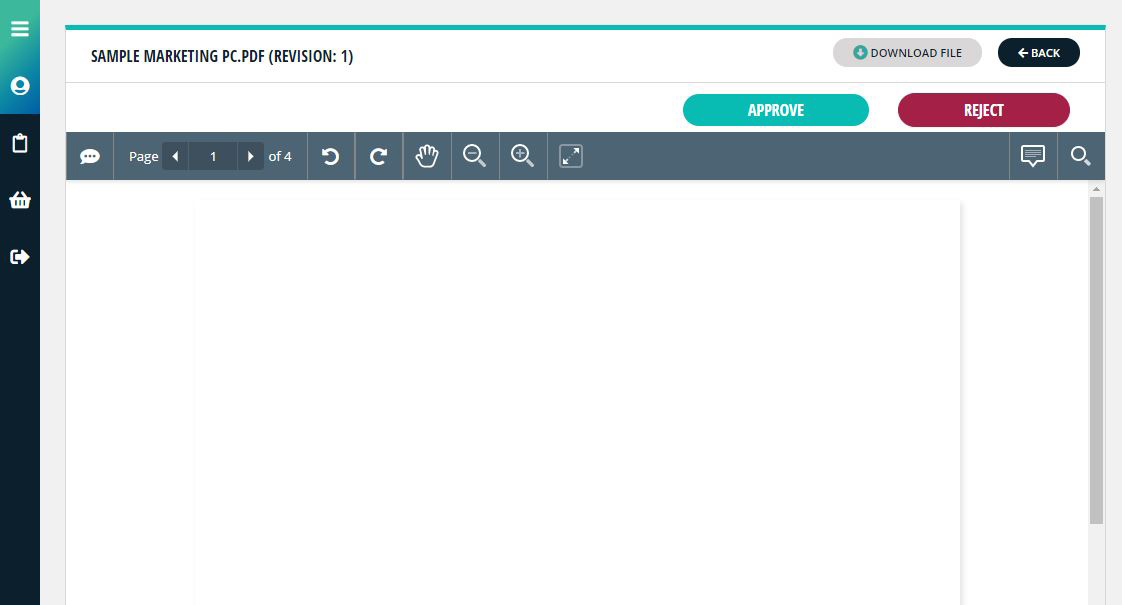
The view screen has several options for viewing your PDF proof along with adding annotations.

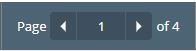
Change Page - Use the right and left arrows to change the page. You can also type a valid page number and press enter to go directly to a specific page.

Rotate Page - Use the right and left rotate arrows to change the page orientation.

Drag Page - Use the hand to drag the page around.

Zoom In/Out - Use the magnify controls to zoom in and out of the page.

Fit Page/Fit Width - Changes the page view to fit page or fit width inside the window.
Annotating PDFs

Annotating PDFs can be done by clicking the annotations icon on the far right of the PDF controls.

To create an annotation on the page, select the color and icon then click anywhere on the page.
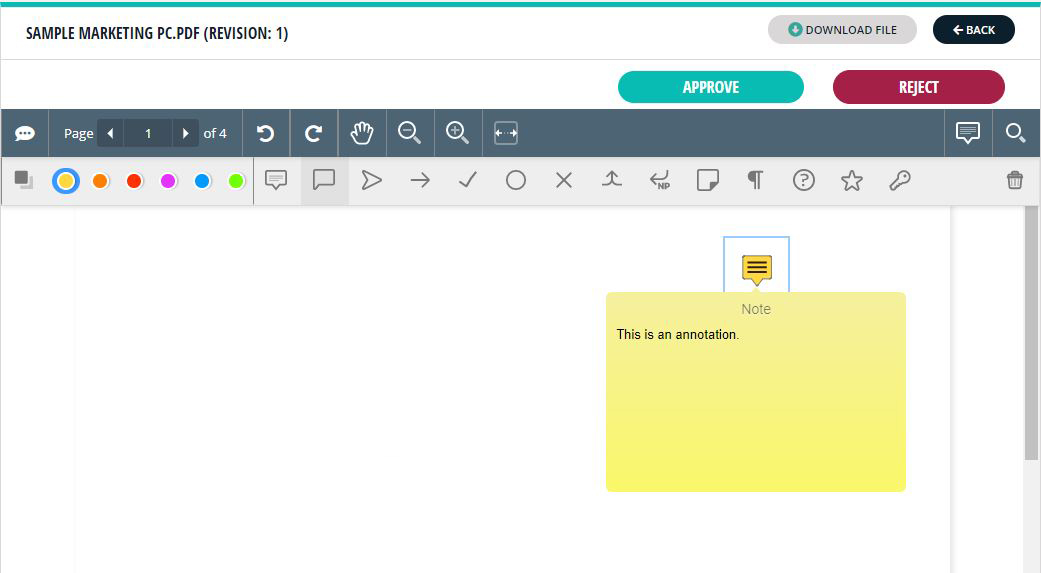
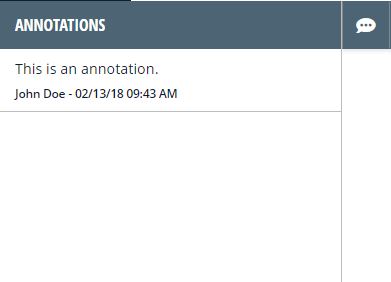
Viewing Annotations

You can view a list of annotations by clicking the chat bubble icon on the far left of the PDF controls.
View Data Proofs
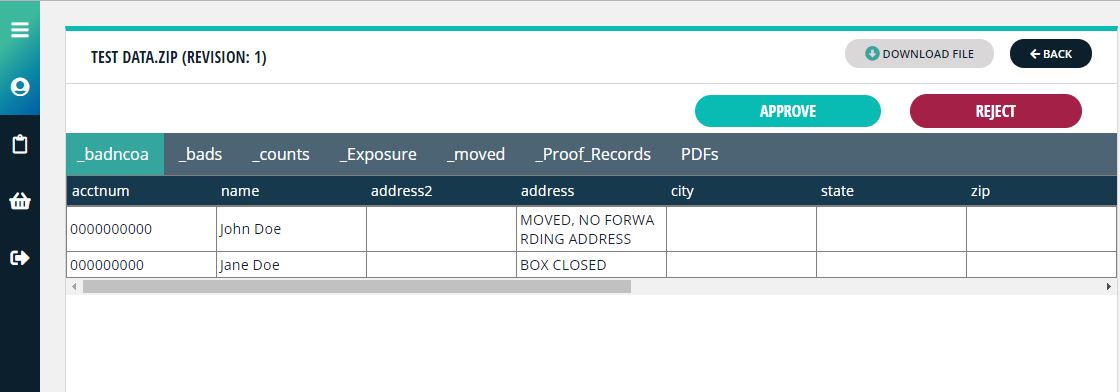
To view a data proof, click the View button from the Proof Landing page or your Dashboard or the thumbnail on the Proof Landing page.
Data proofs do not have annotation capabilities.
Approve/Reject Proof
You can approve or reject a proof from the view screen of any proof.
If the proof has been rejected by a required approver, you won't have the Approve or Reject options.
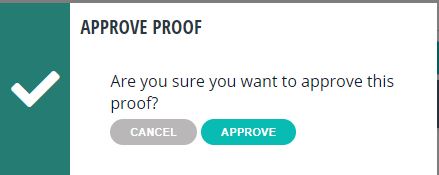
Approve Proof
To approve the proof click the Approve button at the top of the screen. You will receive the following prompt to confirm your approval.
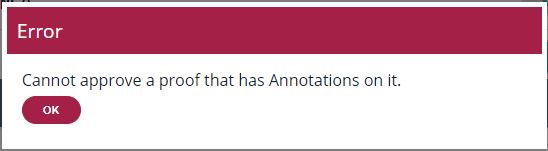
Error Message
You cannot approve a PDF proof if there is an annotation. You will receive the following error.
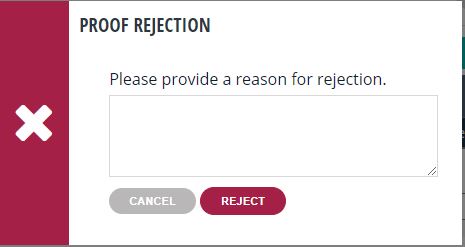
Reject Proof
To reject the proof click the Reject button at the top of the page. If you did not add any annotations, you will be required to give a rejection reason in the confirmation prompt. If you did add annotations, you can still add additional information in the rejection comment.
Job Management - Job Status
The Job Status page can be accessed by clicking the Job Status link beneath the Job Management navigation.
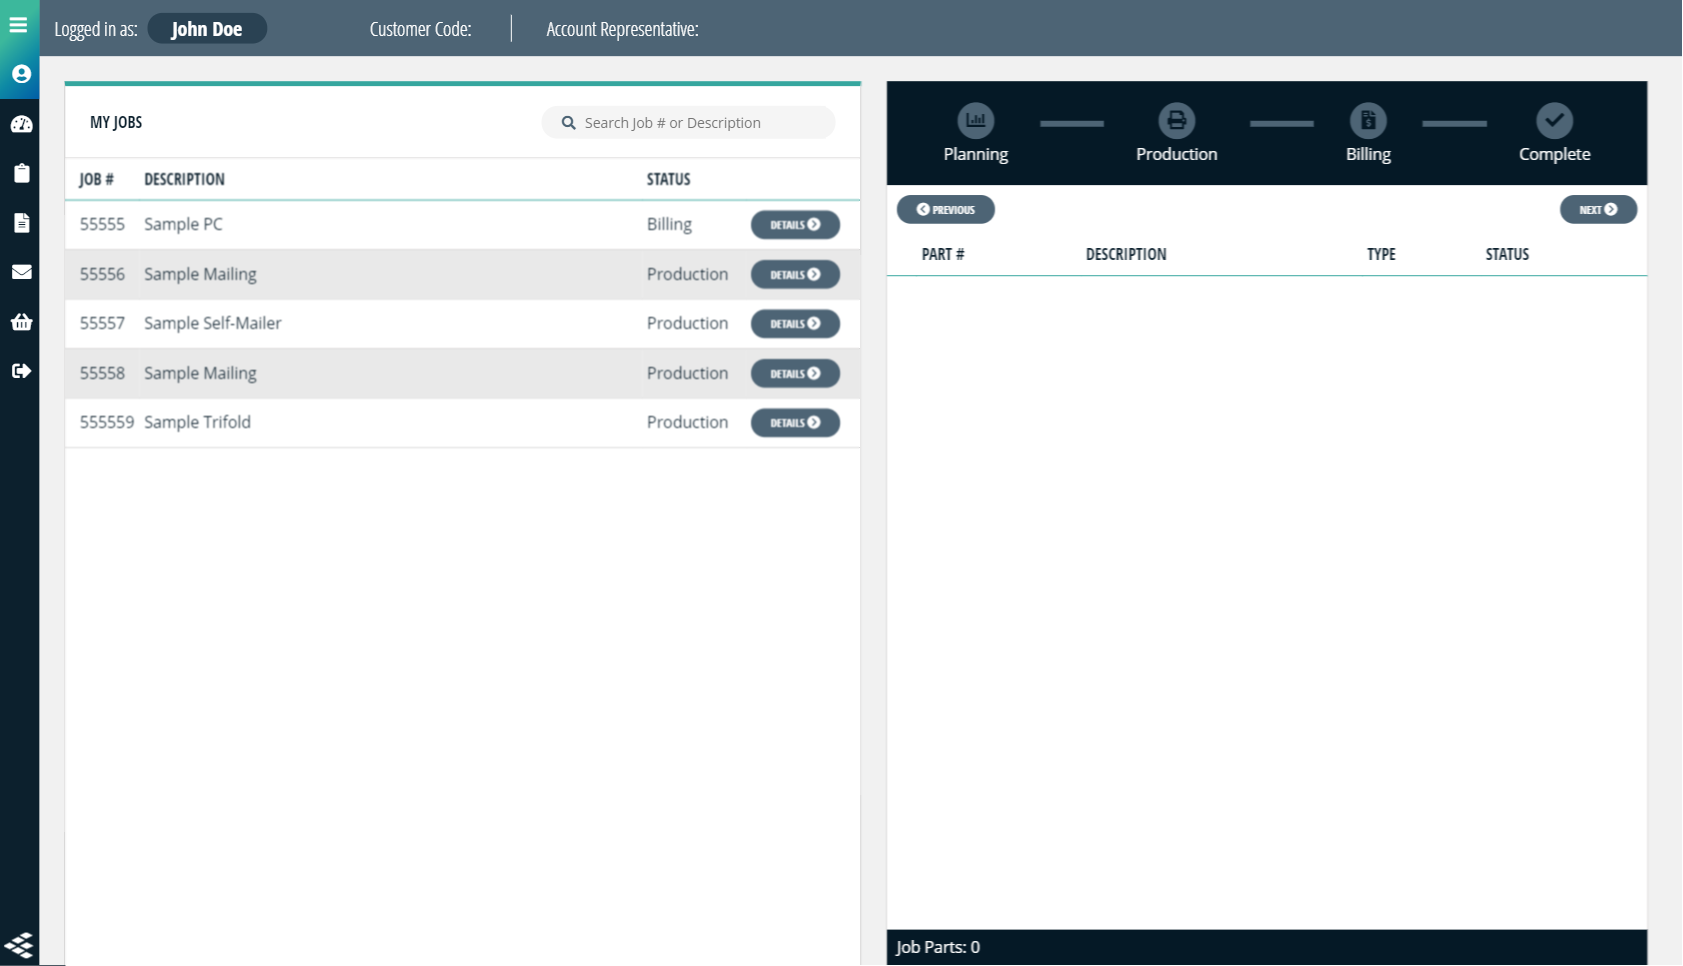
The Job Status page shows your print, mailing or print/mail jobs and their level of completion. Each job has an overall status as well as a part level status, which can be accessed by clicking the Details button to the right of the job name.
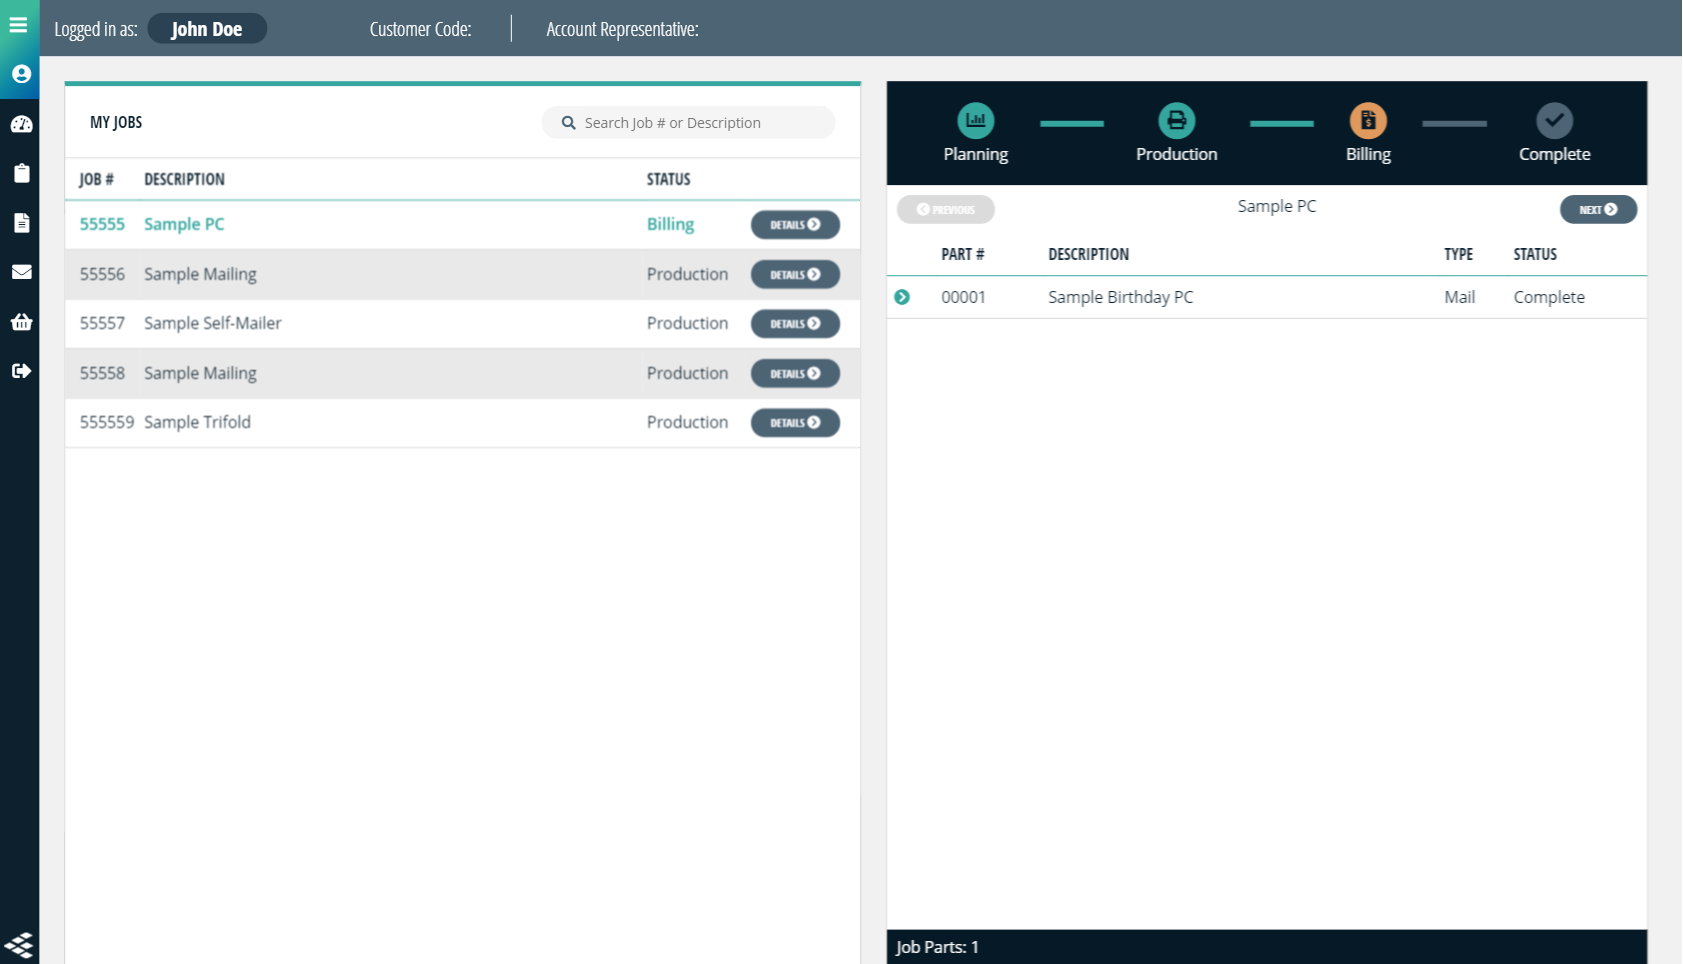
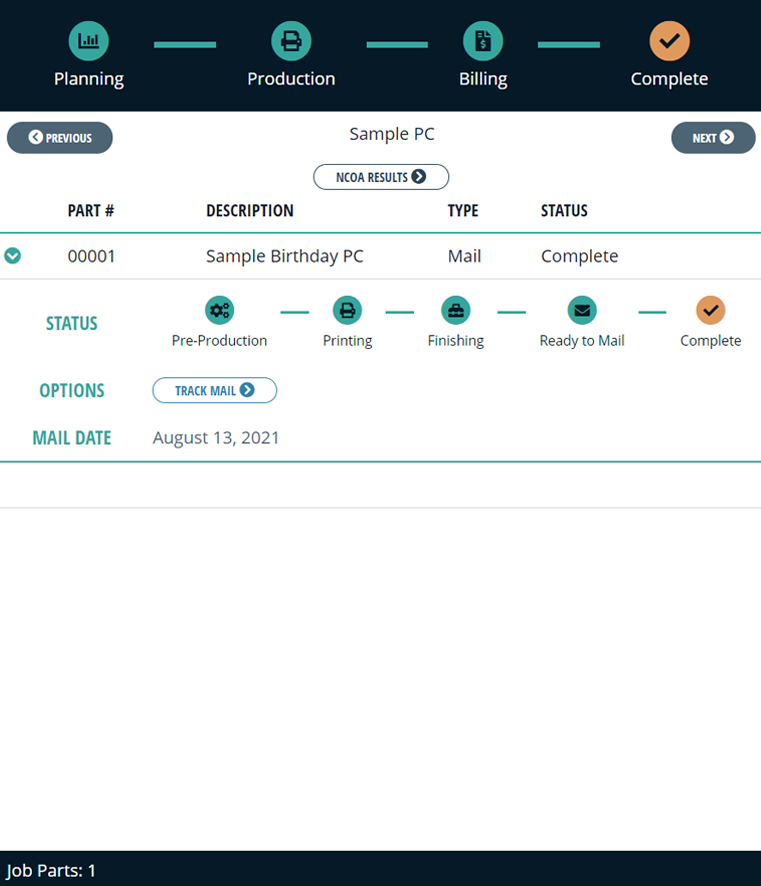
The Job Details Panel shows you the overall status of the current job from planning, production, billing, and complete. Each job part status is listed below, and additional details can be accessed by clicking the green arrow to the left of the part name.
The part details has its own status from pre-production, printing, finishing, ready to mail (if the part requires mailing), and complete. If the part requires mailing you can click Track Mail to be taken to the selected part's mail tracking page.
Tip: Use the Previous and Next buttons to quickly look through the details on your job list.
Job Management - Shipping Status
The Shipping Status page can be accessed by clicking the Shipping Status link beneath the Job Management navigation.
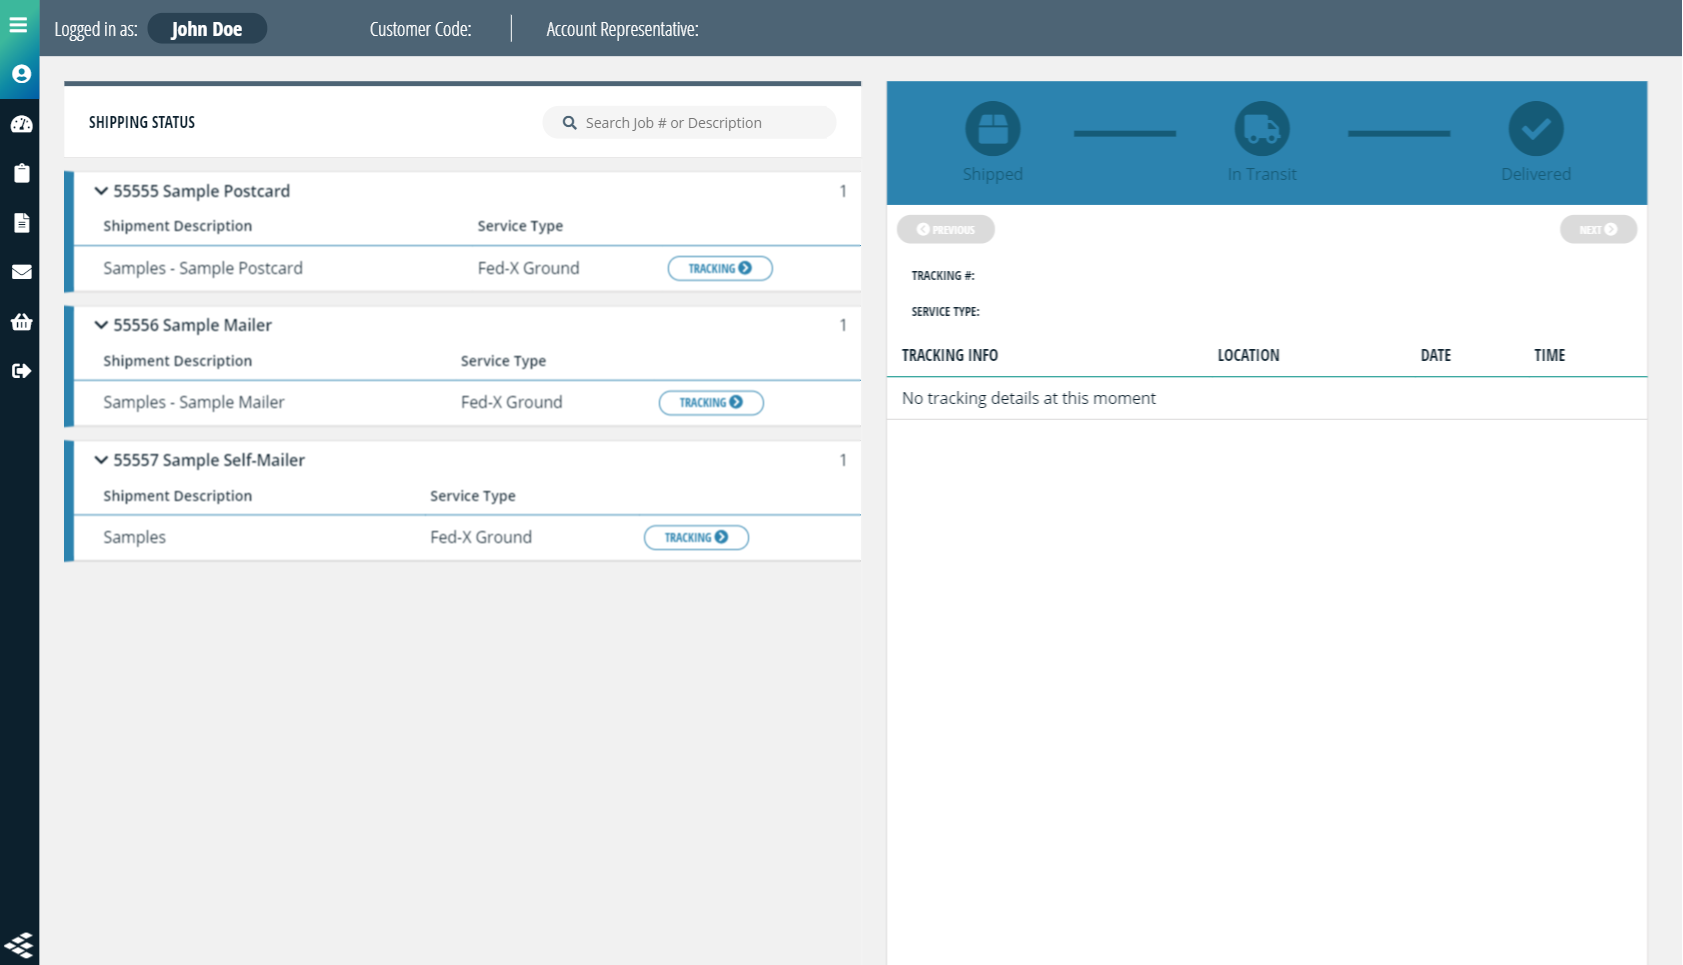
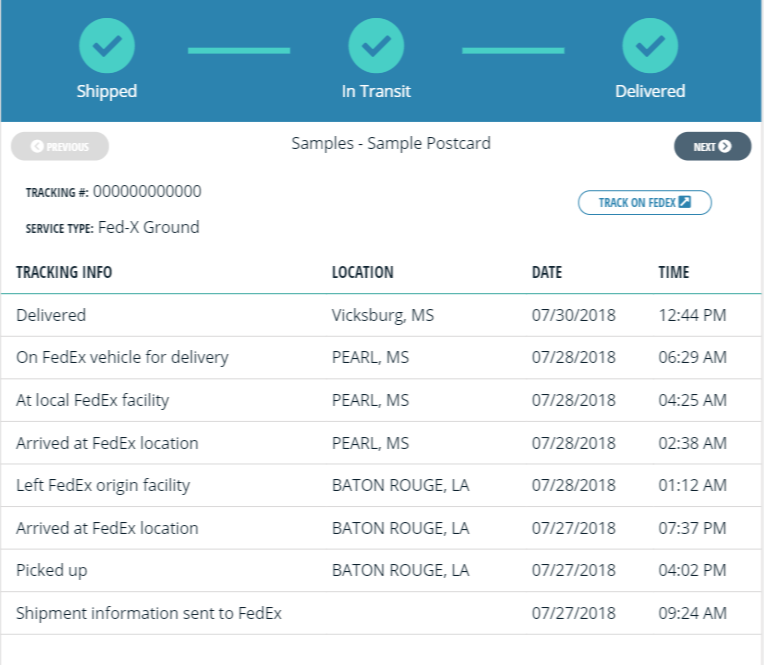
The Shipping Status page shows you packages that have been shipped with detailed tracking information. You can view the tracking details by clicking Tracking on the right side of the selected shipment.
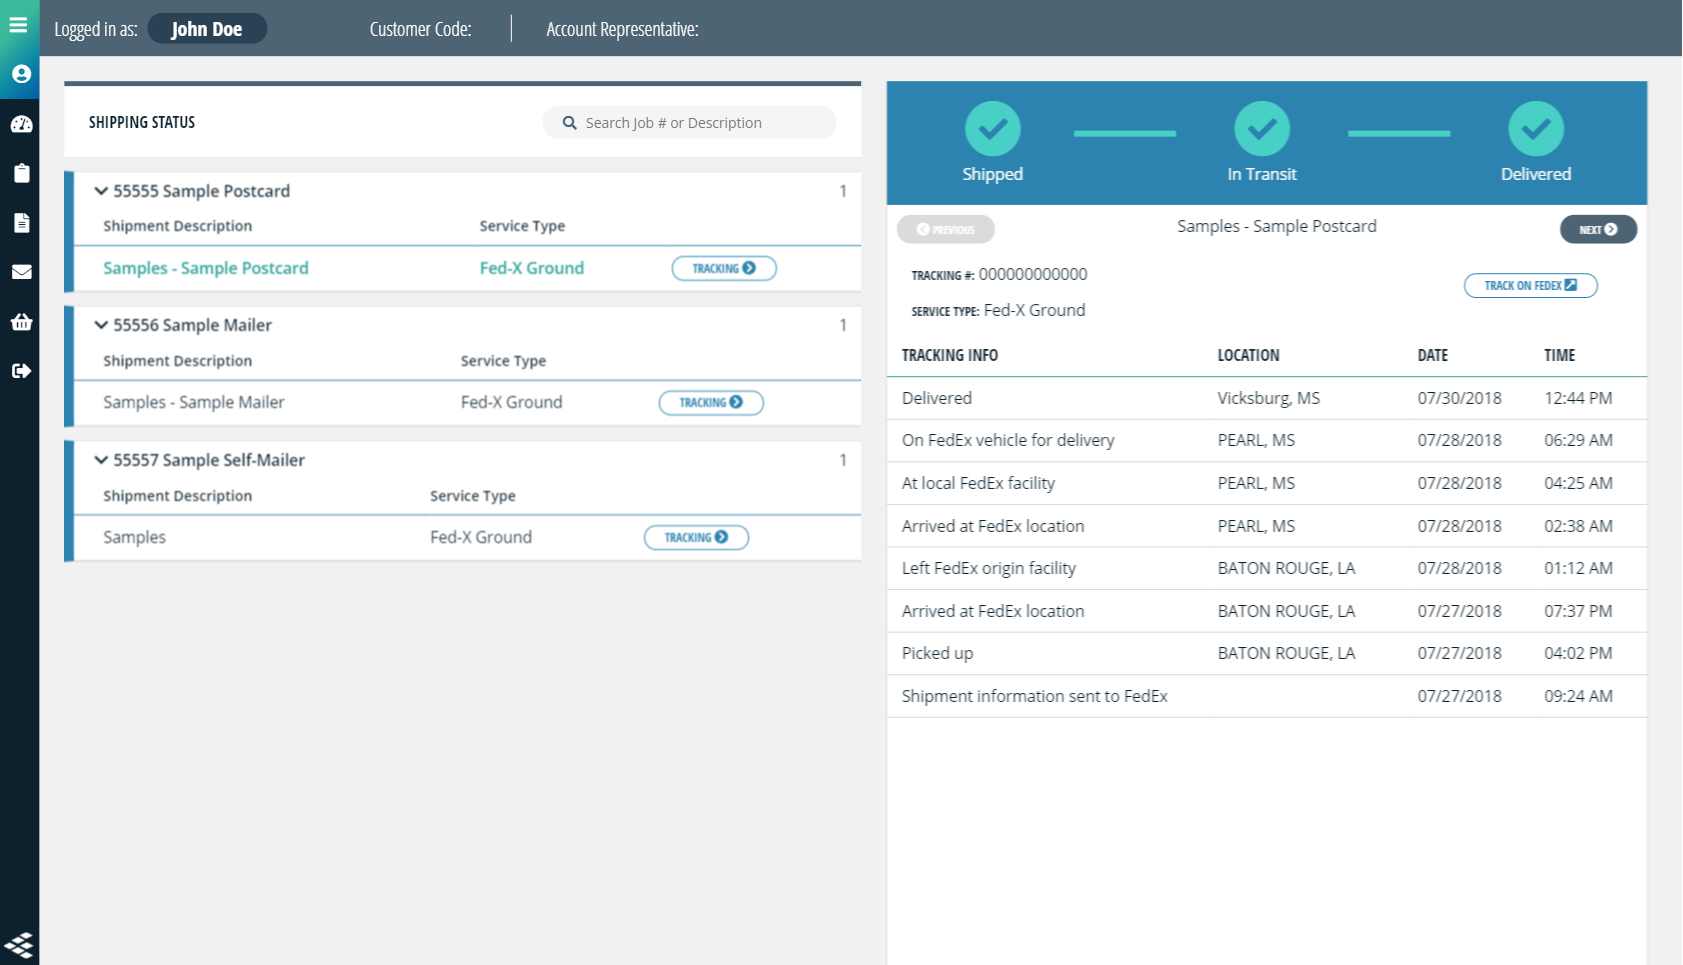
The tracking details are similar to what you would see on the shipping carrier's tracking webpage, including the tracking number, tracking info, location, date, and time.
Tip: Use the Previous and Next buttons to quickly look through the details on your shipments.
Job Management - Inventory Status
The Inventory Status page can be accessed by clicking the Inventory Status link beneath the Job Management navigation.

The Inventory Status page shows your inventory with on hand and low stock warning details. You can view each inventory item's details by clicking the Details button to the right of the inventory item.
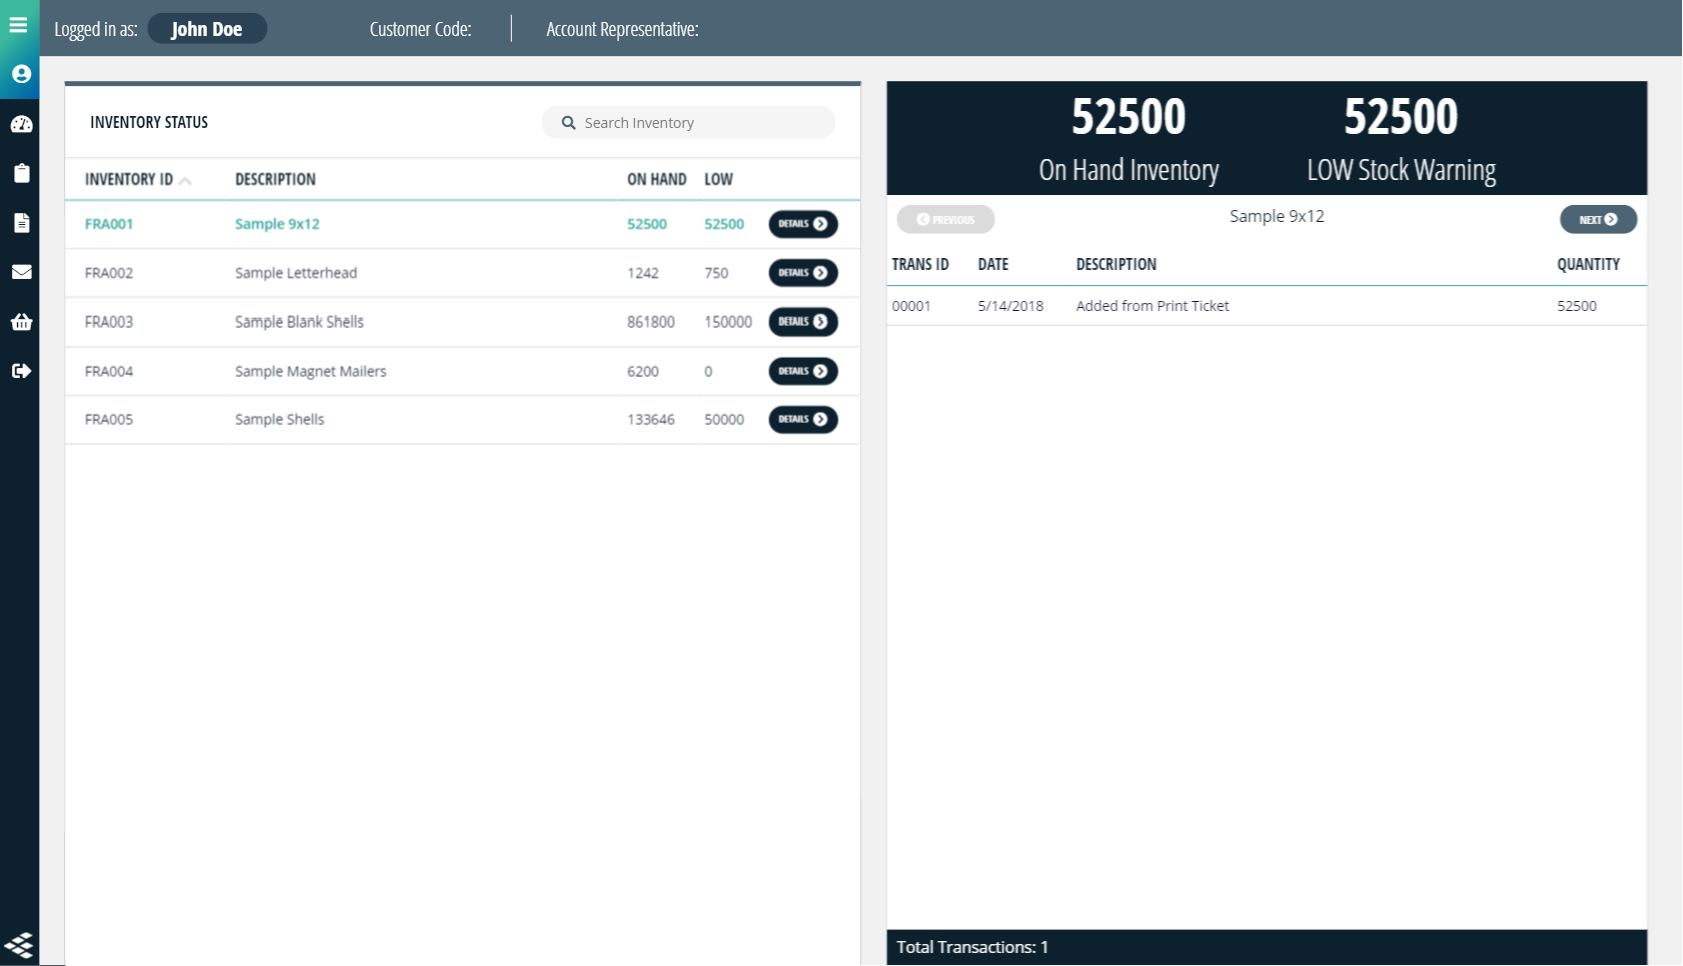
Tip: Use the Previous and Next buttons to quickly look through the details of your inventory items.
File Management
The File Management page can be accessed by clicking the File Management link in the main navigation.
Upload Files - While Logged In
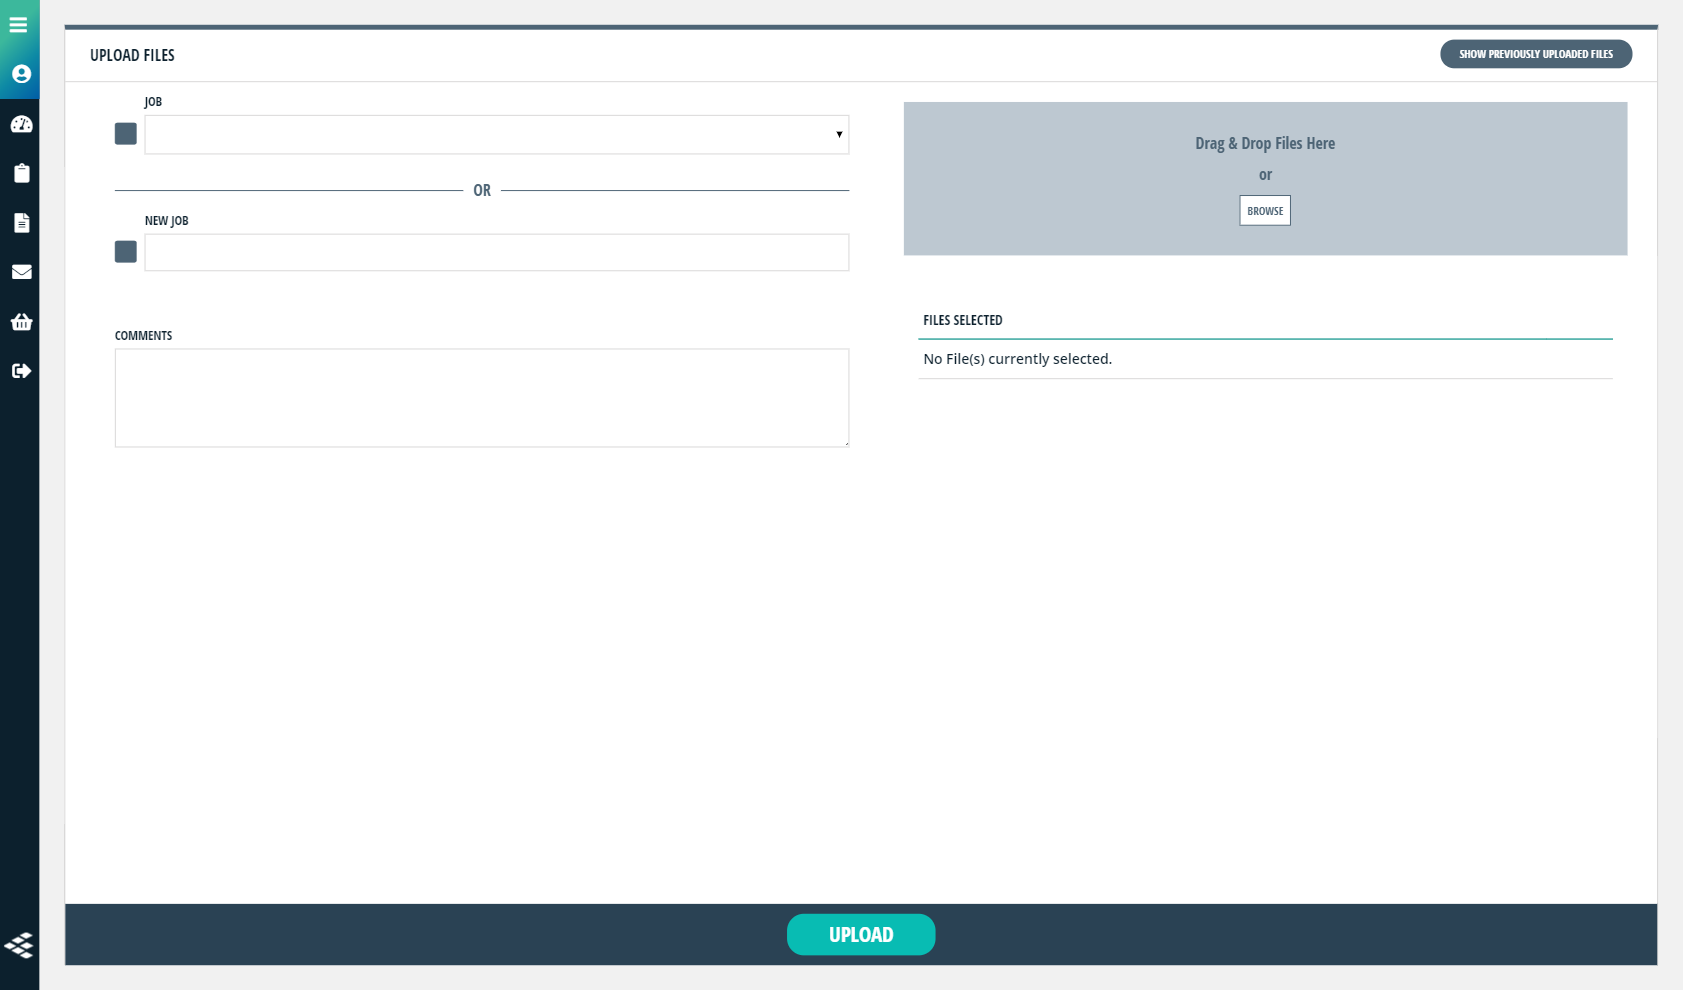
If you are logged into the client portal, you can easily upload files to a current job or new job. Select which job the files are for and add comments if necessary. Simply drag & drop your file(s) or browse for the file(s) by clicking browse, then click Upload when you are finished.

You will receive an Upload Successful message once the files have uploaded successfully. We will preflight your file(s) and send you an email summary of any potential problems. Click the Click Here To Start Another Upload button to return to the upload screen.

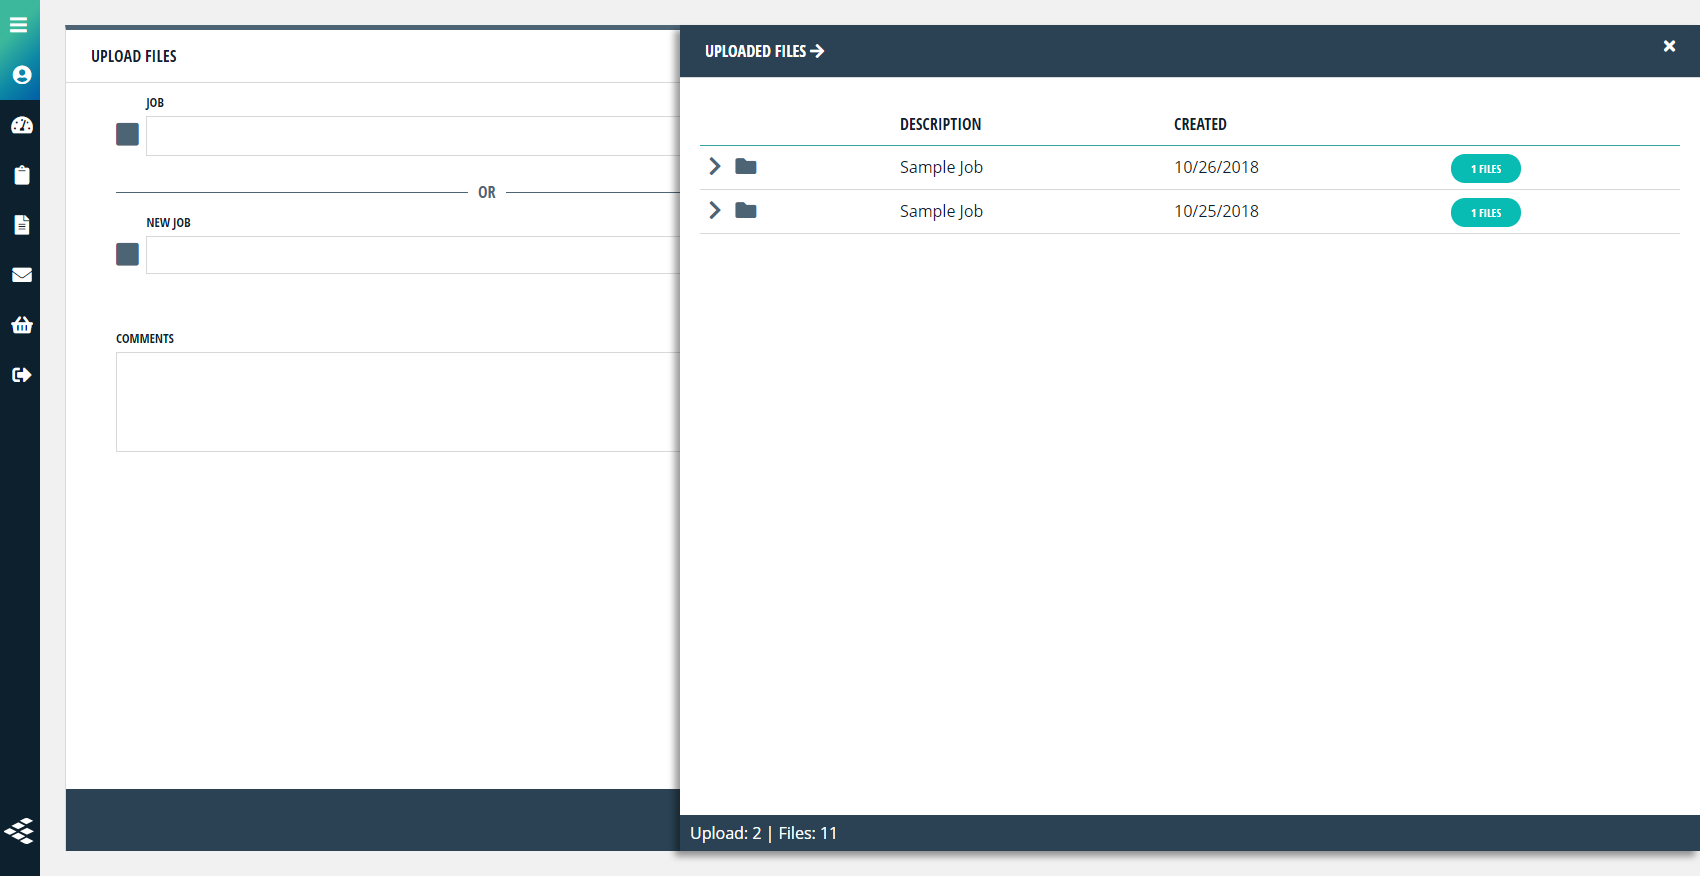
View Previous Upload Files
You can view your previously uploaded files by clicking the View Previously Uploaded Files button in the top right corner of your screen.
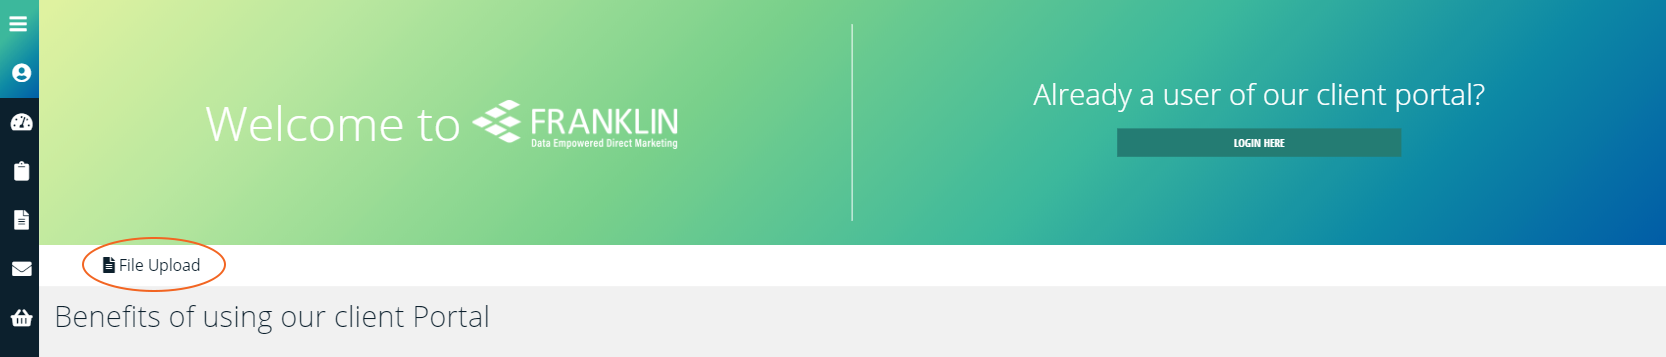
Upload Files - Anonymously
If you are not logged into the client portal, or you are not a client portal user, you can still upload files to our system. To upload files, click the
File Upload link on the https://portal.gofranklingo.com webpage.
Please fill out the required information then drag & drop or browse for the file(s) you would like to upload. Click the Upload button when finished.
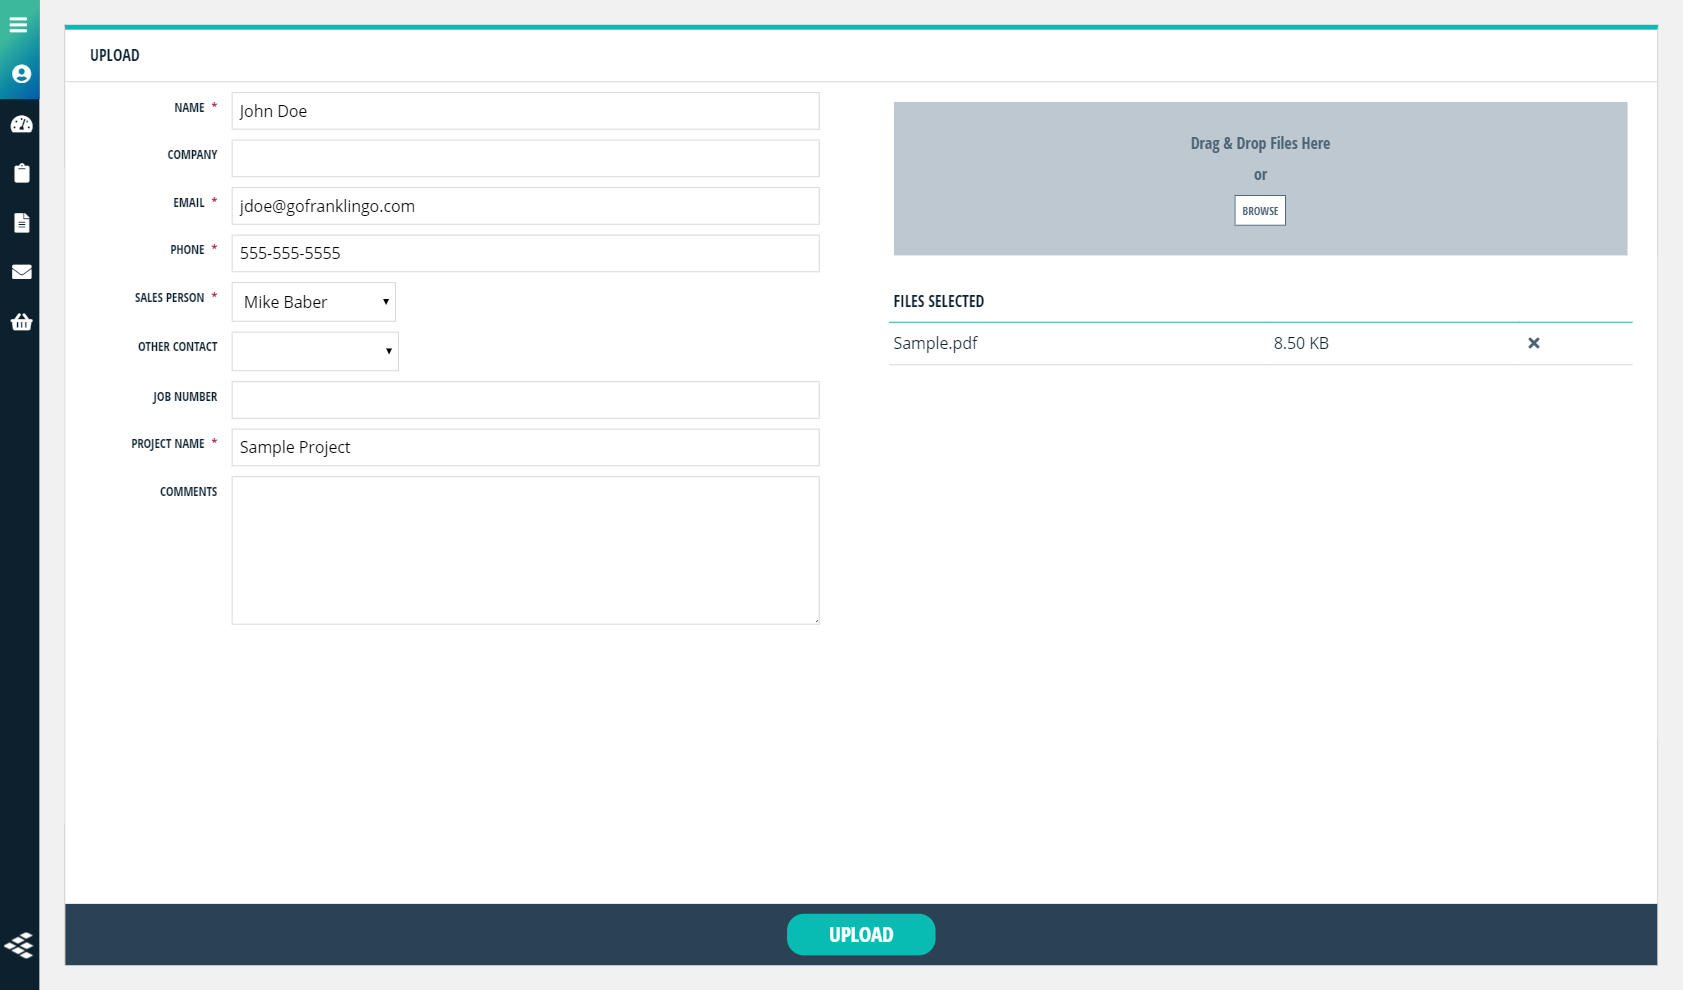
You will receive an Upload Successful message once the files have uploaded successfully. We will preflight your file(s) and send you an email summary of any potential problems. Click the Click Here To Start Another Upload button to return to the upload screen.
Mail Management - Mail Tracking
The Mail Tracking page can be accessed by clicking the Mail Tracking link beneath the Mail Management navigation.
The mail tracking page gives you an overview of the tracking progress on all of your mailing jobs including the Mailed On date. To get more details on a particular job, you can click the Details button to the right of the job name.
The tracking details show what percentage of the job is enroute and scanned for delivery. Clicking on the Enroute , Scanned For Delivery, or Returned buttons will take you to the View Tracking page associated to that job.
Searching for a Person, Address or Account Number
You can search for a person, address or account number by using the Search Bar at the top of the Mail Tracking page.
Type in the person, address or account number you are looking for and press Enter. You will be shown a list of people, addresses or account number that match your search criteria and the option to download the results as a .CSV or XLSX file.
Return to the Mail Tracking page by click the Back button or search for another person or address by using the search bar in the top right corner.
Tracking Single or Multiple Mail Jobs
You can track a single job or multiple jobs at once by using the Track button. To track a single job, click the blue Track button to the right of the job or part name. To track multiple jobs, check the checkboxes of the jobs you want to include, then click the Track Checked button at the top of the screen.
On the tracking details screen you can export the data or people to a .CSV or .XLSX file that can be fed to your call centers or sales team.
You can click on any geographical segment link to see the individual mail recipients.
Here you can check individual mail pieces, the date their mail was scanned for delivery, and how many days it took.
Mail Management - ACS
FranklinForward ACS enables you to eliminate returned mail and view undeliverable mail online. You have to sign up for this service using the form at http://cdn.gofranklingo.com/docs/acs.pdf. If you have any questions, please contact your account executive.
If you've already signed up for ACS, you can access it by clicking the ACS link beneath the Mail Management navigation or by clicking the Daily ACS Tracking button on the Mail Tracking screen.
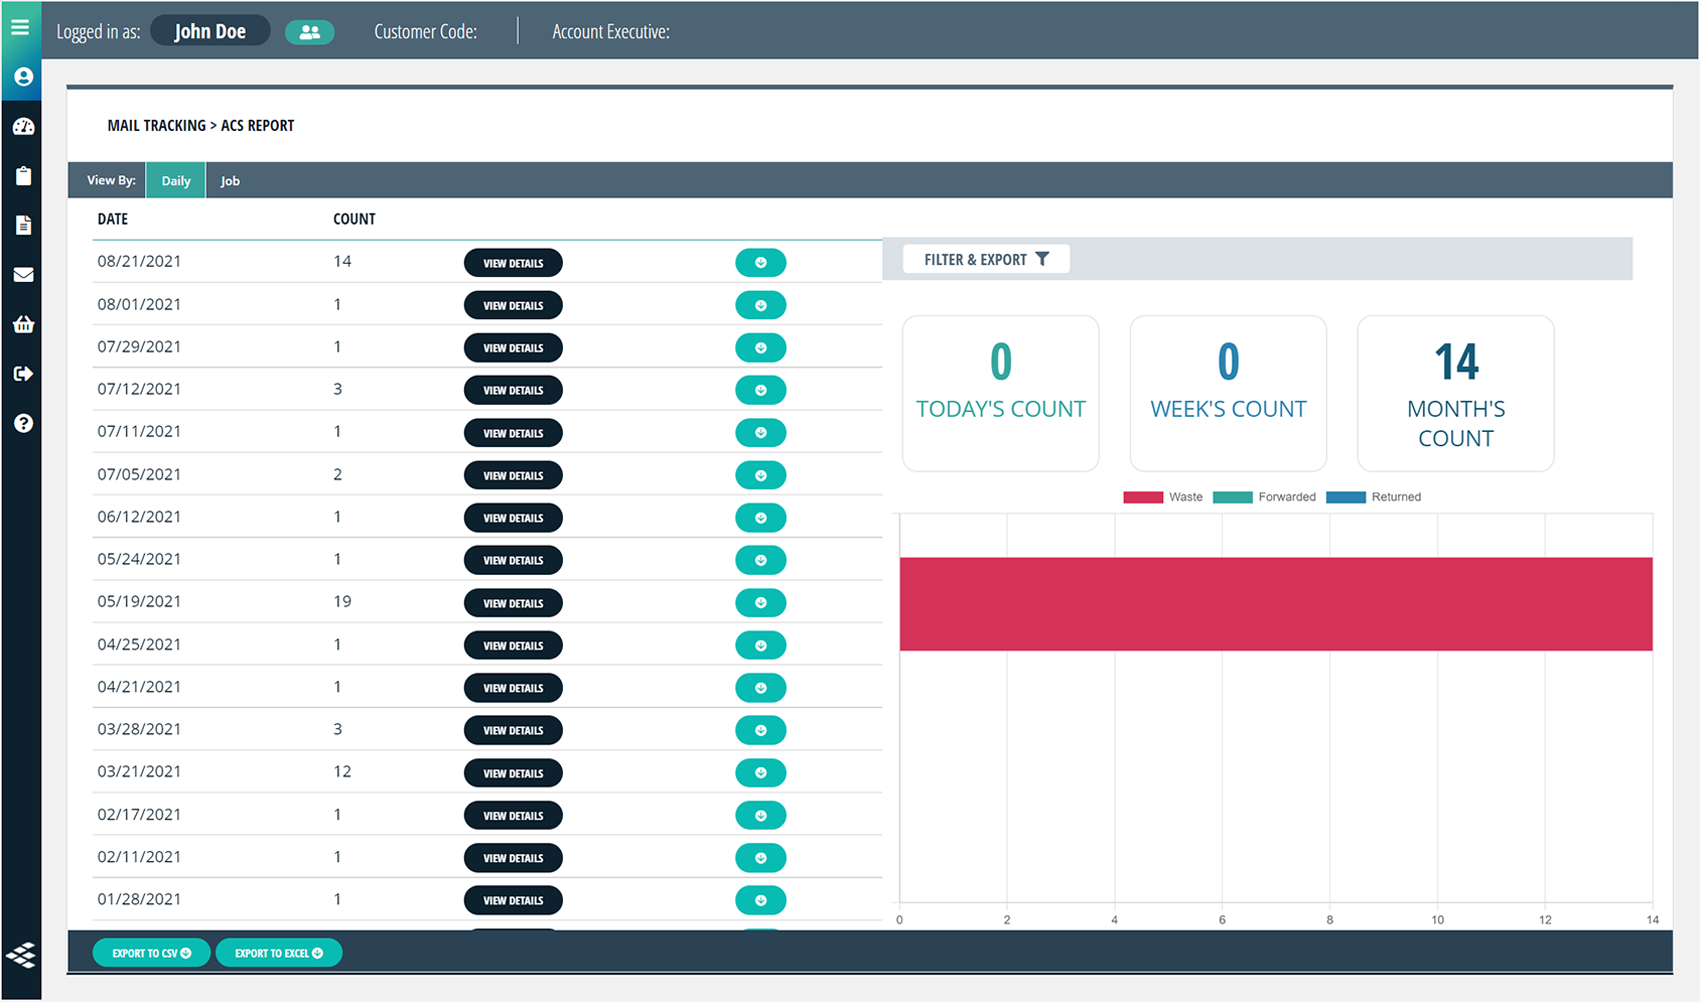
You can view your ACS results two distinct ways - Daily and By Job. You can switch between the two by clicking the links in the navy blue tab in the top left corner. The daily summary view will show your ACS counts by date (the date we received each ACS record from the post office). It represents all ACS records received on a particular day across ALL of your jobs.
You have the option to download this summary data as a .CSV or .XLSX file.
The right column shows analytical data based on today's count, week's count, and month's count along with a visual graph of total waste, forwarded and returned mail.
To view the detailed ACS records, click the View Details button.
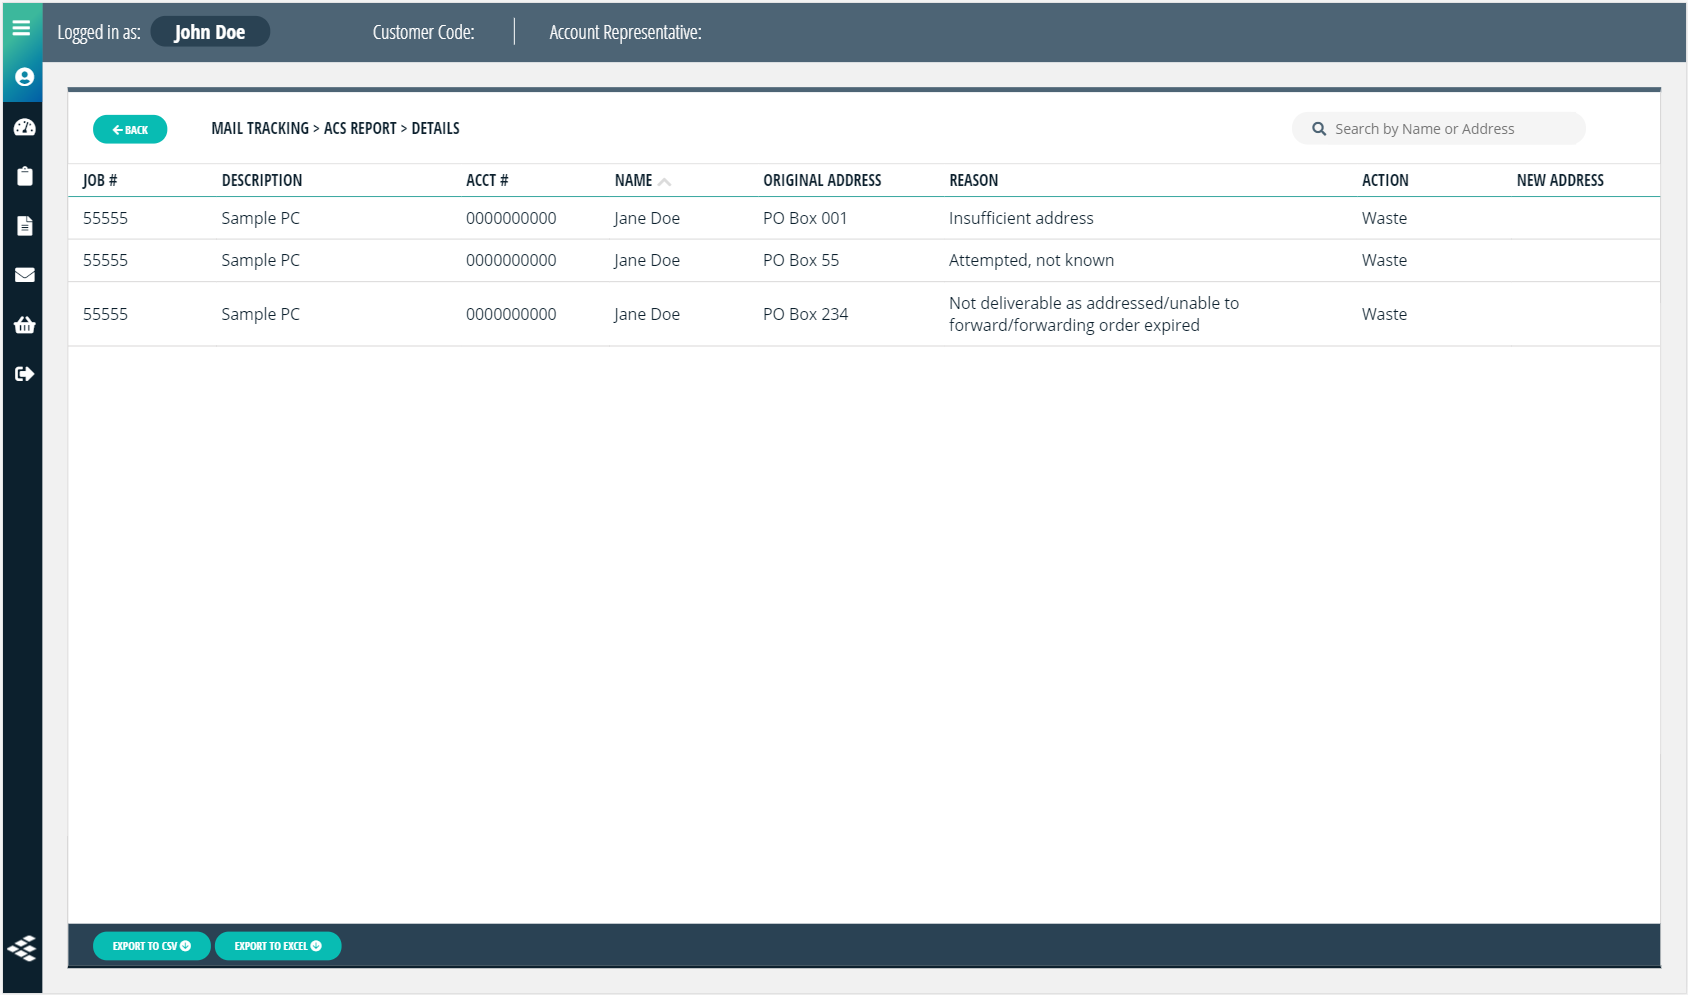
The ACS Report > Details page displays a subset of the ACS fields for cleaner viewing (i.e. only the Address, not the City/State/Zip) - in order to see all address information, or to download and save locally, click either the Export To CSV or Export To Excel buttons at the bottom.
The Reason field from the post office indicates the reason that the piece was not deliverable. It is the same information that would be found on the “yellow sticker” for a piece of physical returned mail.
The Action field indicates what action the post office took with that particular mailer. ‘Waste’ indicates that the piece was disposed of; ‘Forwarded to new address’ indicates that the piece was forwarded (because a forwarding address was found for that person – see the New Address fields for this forwarding address). Note that you will only see ‘Forwarded to new address’ for First Class mail – for Standard Class mail, because mail forwarding is not built into the rate, the piece will still be disposed of even if a forwarding address is found. You will, however, still receive the forwarding address via the New Address fields in the ACS file – so you can update your records accordingly so they can receive future mailers.
Filter & Export Options
FranklinForward ACS offer in-depth filtering options on both the Daily and Jobs view for detailed reporting.
Daily View
On the Daily view, you have the option to export records based on a date range. Select the FILTER & EXPORT button on the right, above the graph. Once selected, the Export to CSV and Export to Excel buttons at the bottom of the page will be unavailable.
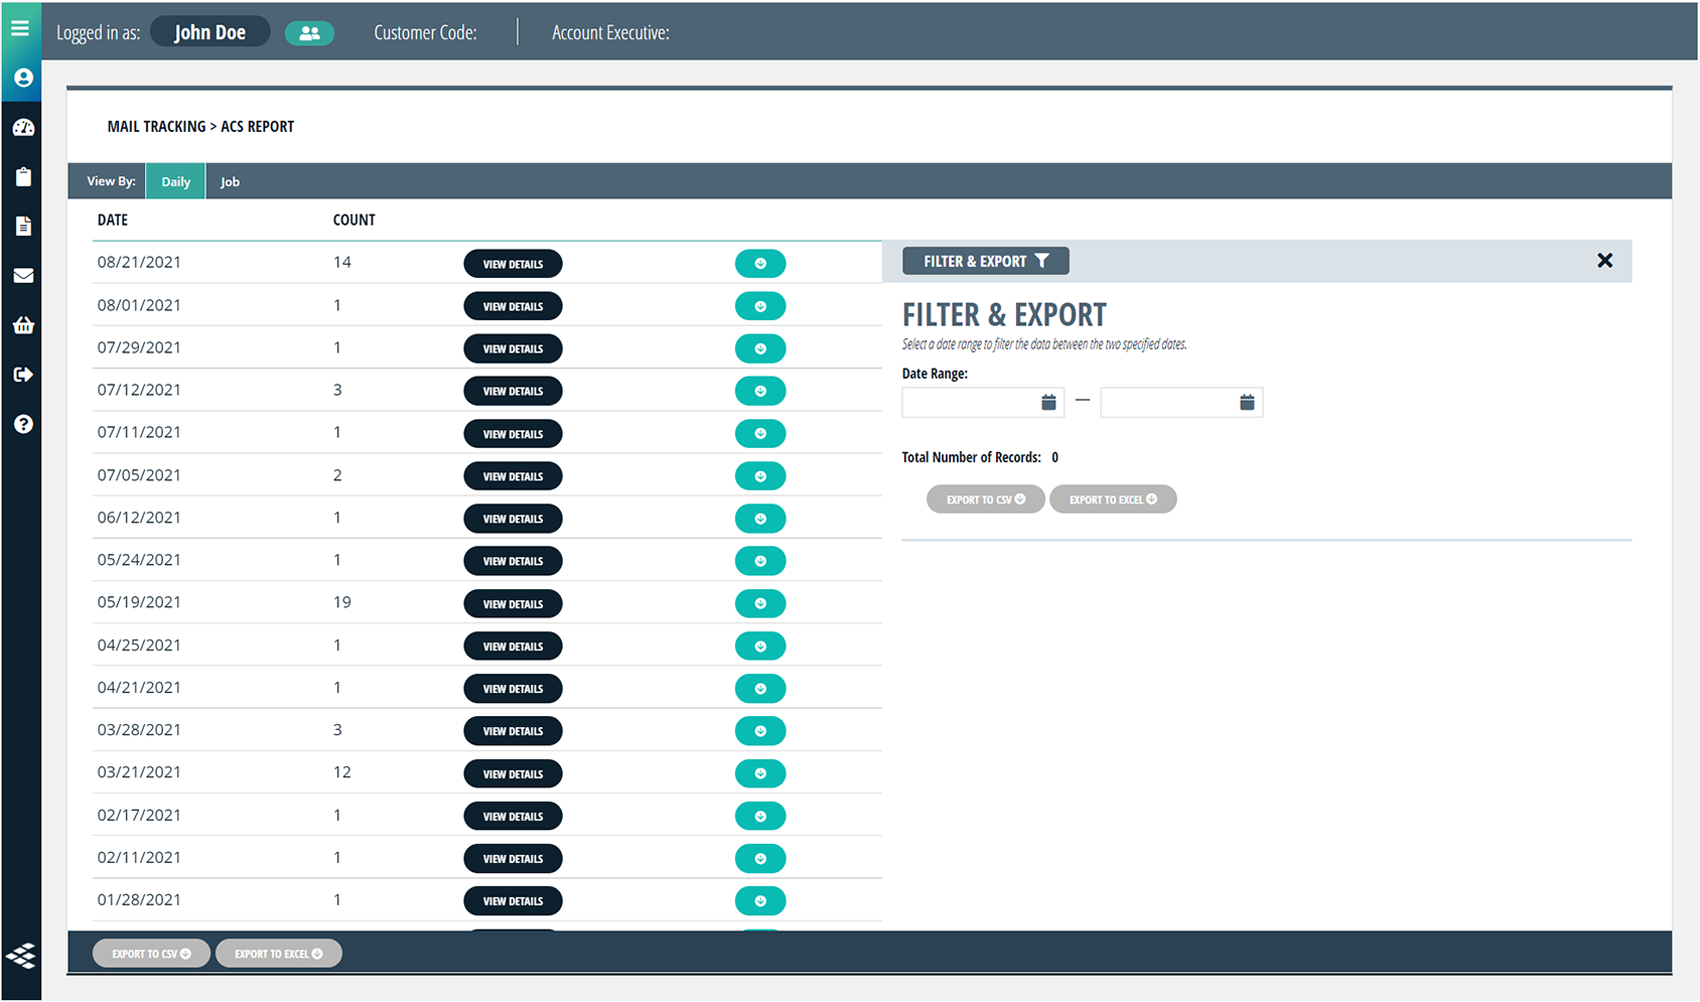
Once activated, the Filer & Export options will appear with a Date Range field. Select a date range to filter the data to export and the total number of records will populate. You then have the option to download the filtered data as a .CSV or Excel file.
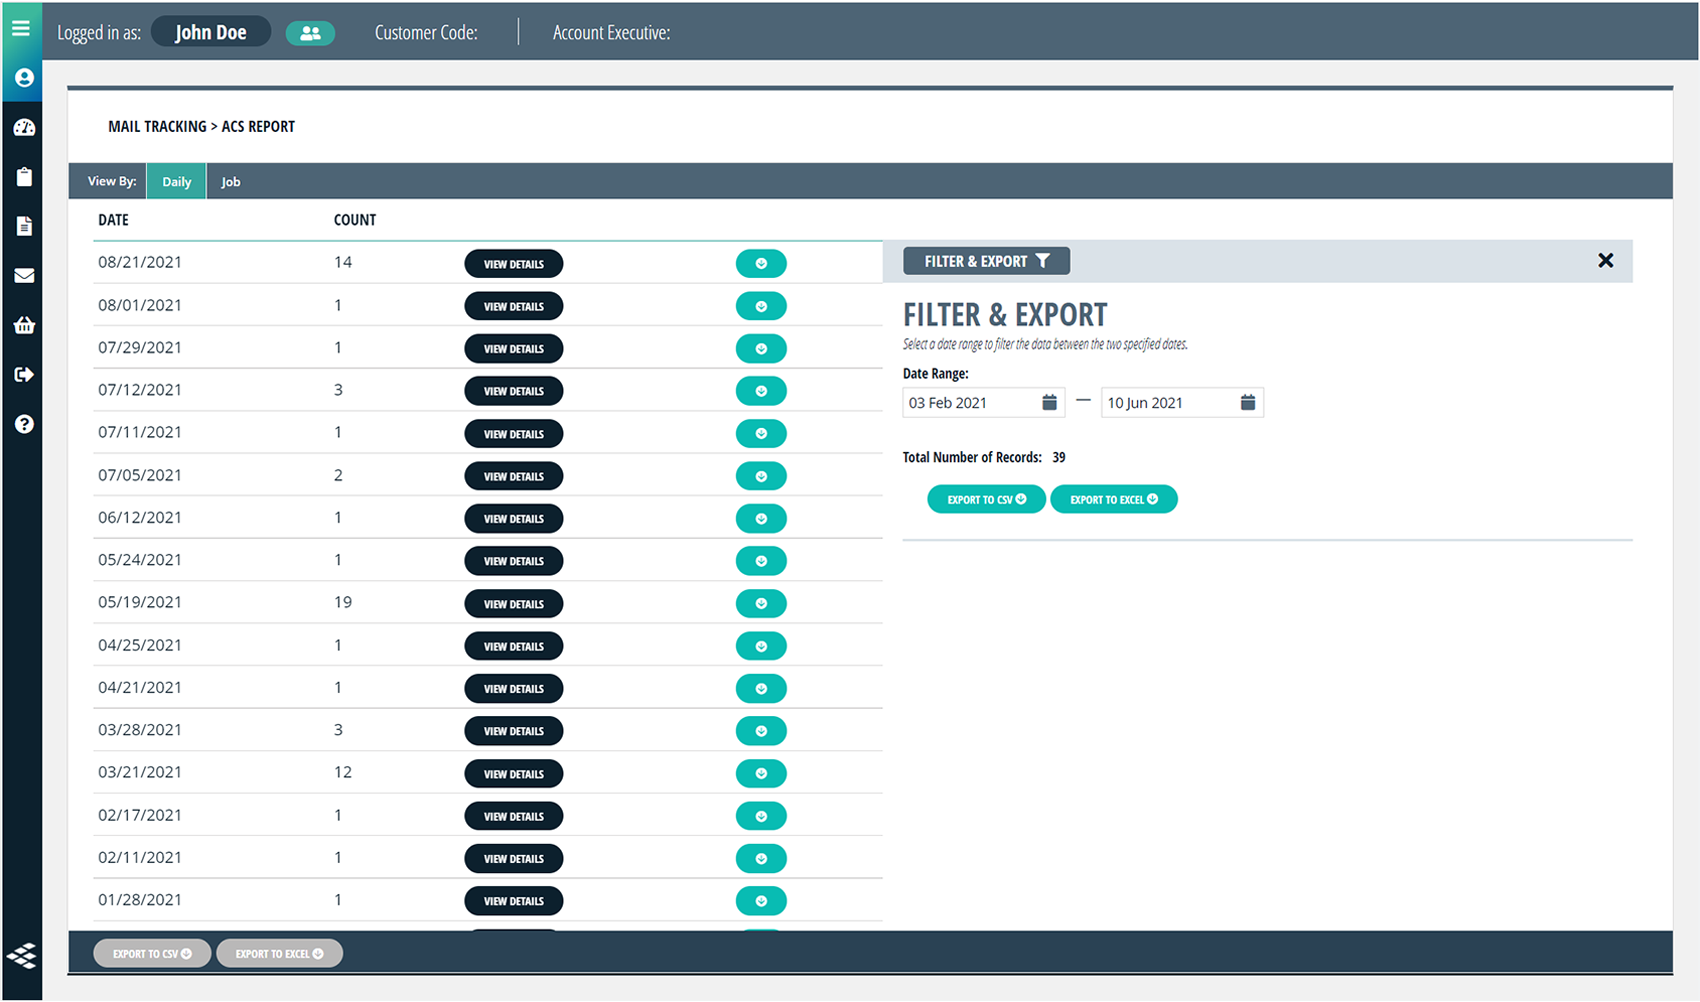
To close out of the Filter & Export options, click the X at the top right.
Jobs View
On the Jobs view, you have the option to export records based on a job, multiple jobs and/or a date range. Select the FILTER & EXPORT button on the right, above the graph. Once selected, the Export to CSV and Export to Excel buttons at the bottom of the page will be unavailable.
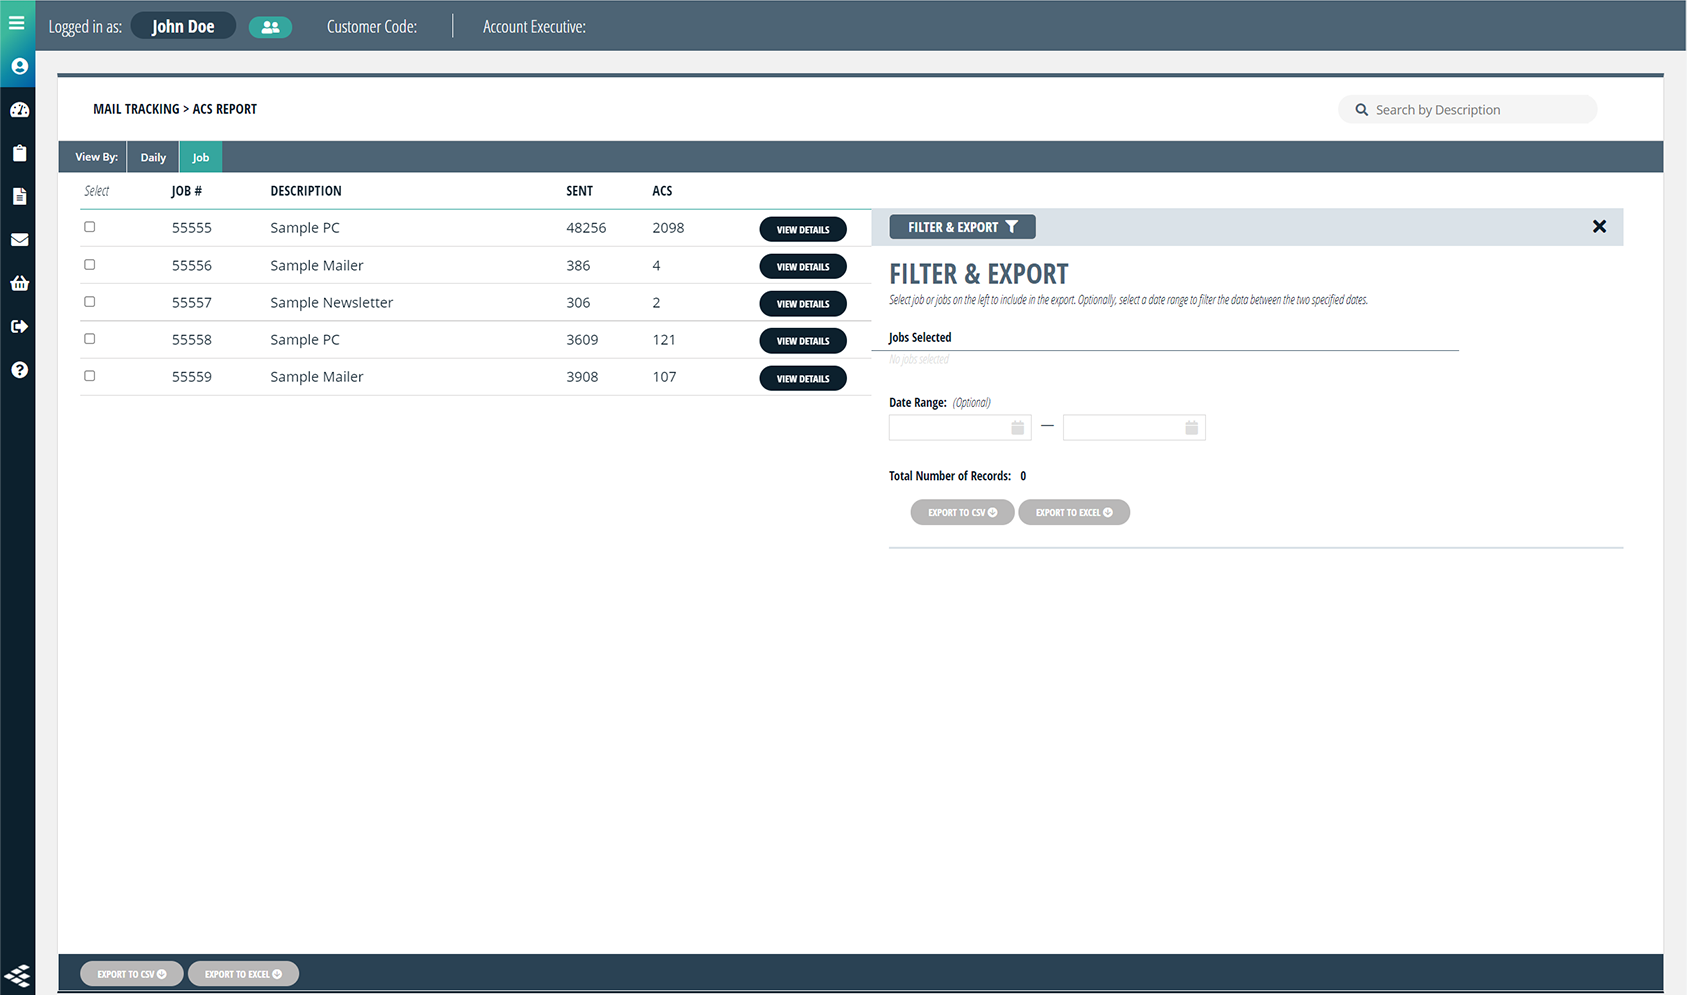
Once activated, the Filter & Export options and the ability to select jobs on the left will appear. On the Jobs view, you have a few options:
- Filter by date range only: To export all jobs within a date range, simply leave all jobs unselected and specify the dates.
- Filter by job(s): To export specific jobs, select the jobs on the left and leave the date range blank. You can remove a job from the export by clicking the X next to the job name in the Filter & Export panel.
- Filter by job(s) and date range: To export specific jobs within a date range, select the jobs on the left and specify the date range. You can remove a job from the export by clicking the X next to the job name in the Filer & Export panel.
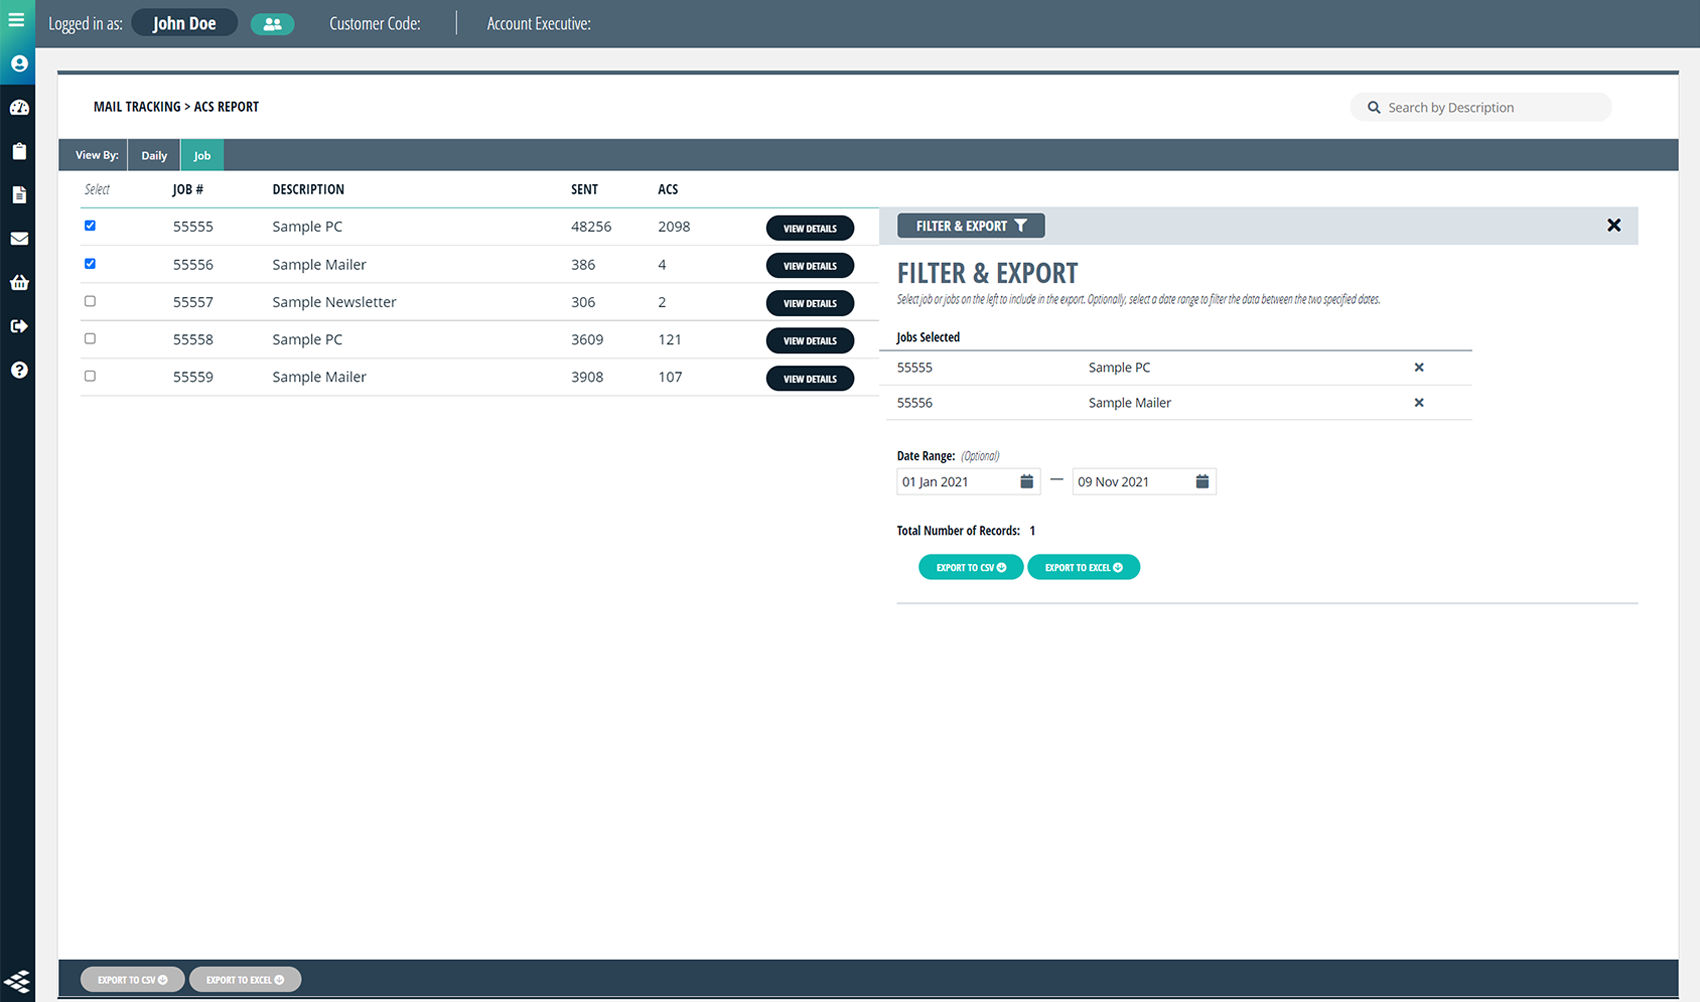
Once you have specified the options, you can download the filtered data as a .CSV or Excel file.
To close out of the Filter & Export options, click the X at the top right.
Mail Management - NCOA
The NCOA page can be accessed by clicking the NCOA link beneath the Mail Management navigation.
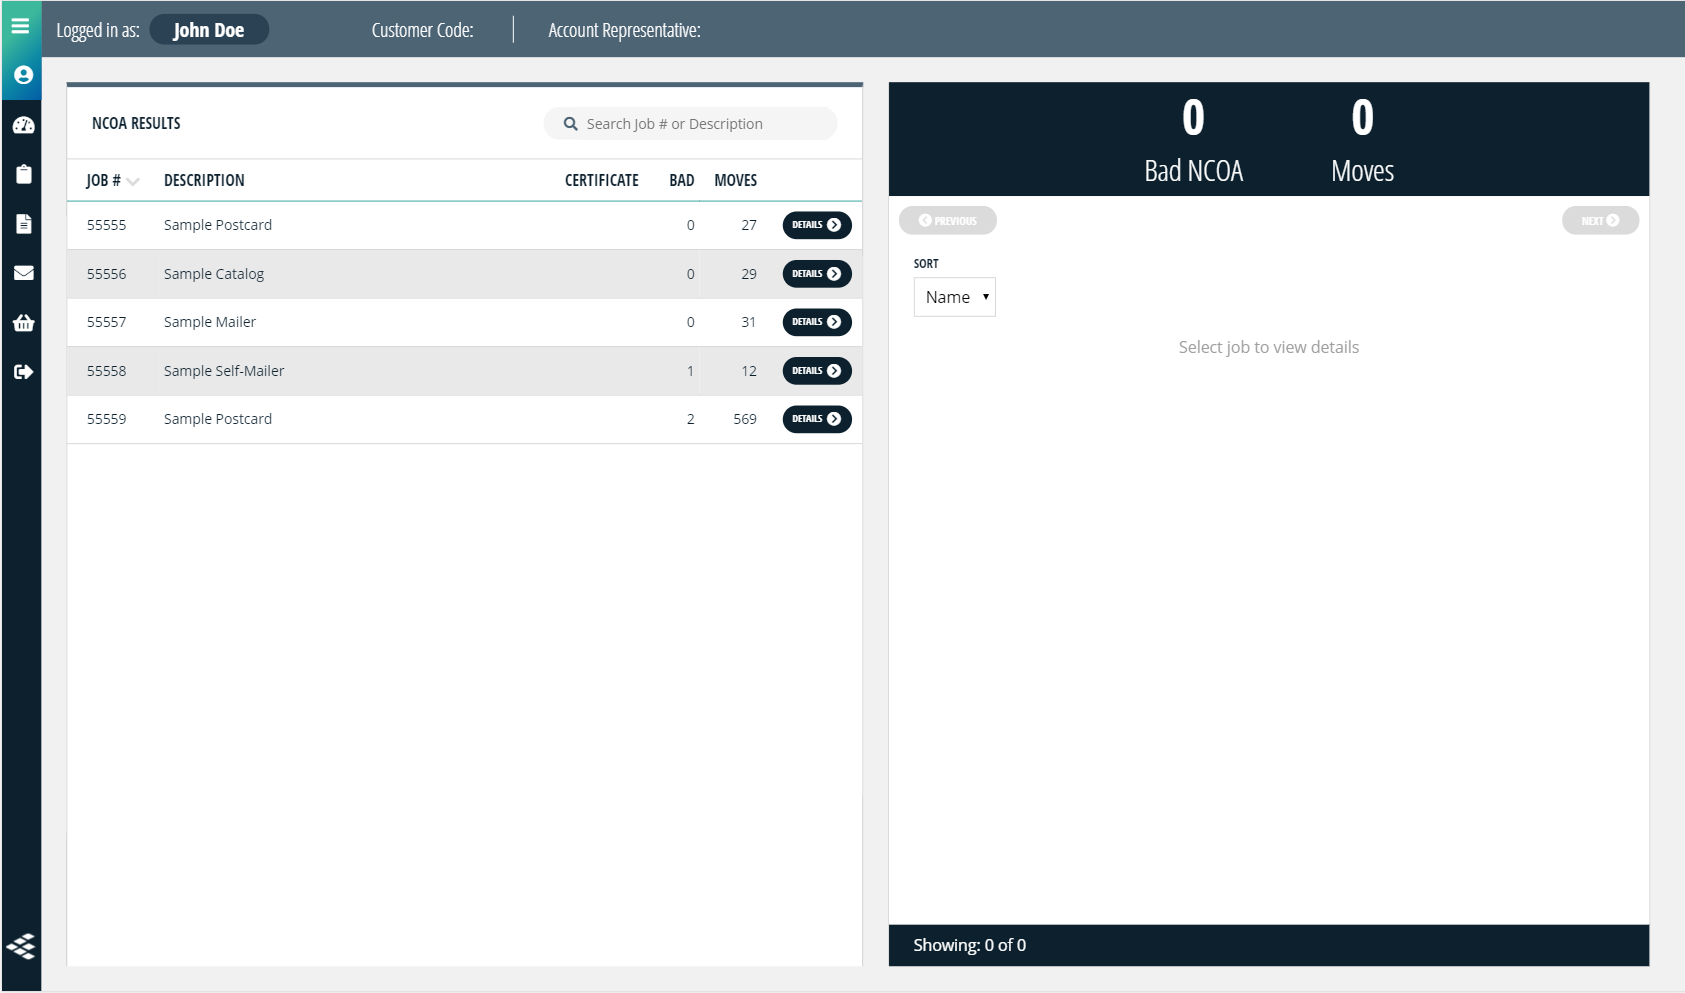
The NCOA page gives you an overview of your NCOA bad or move results based on job number. To view a certain job's NCOA details, click the Details button to the right of the job description.
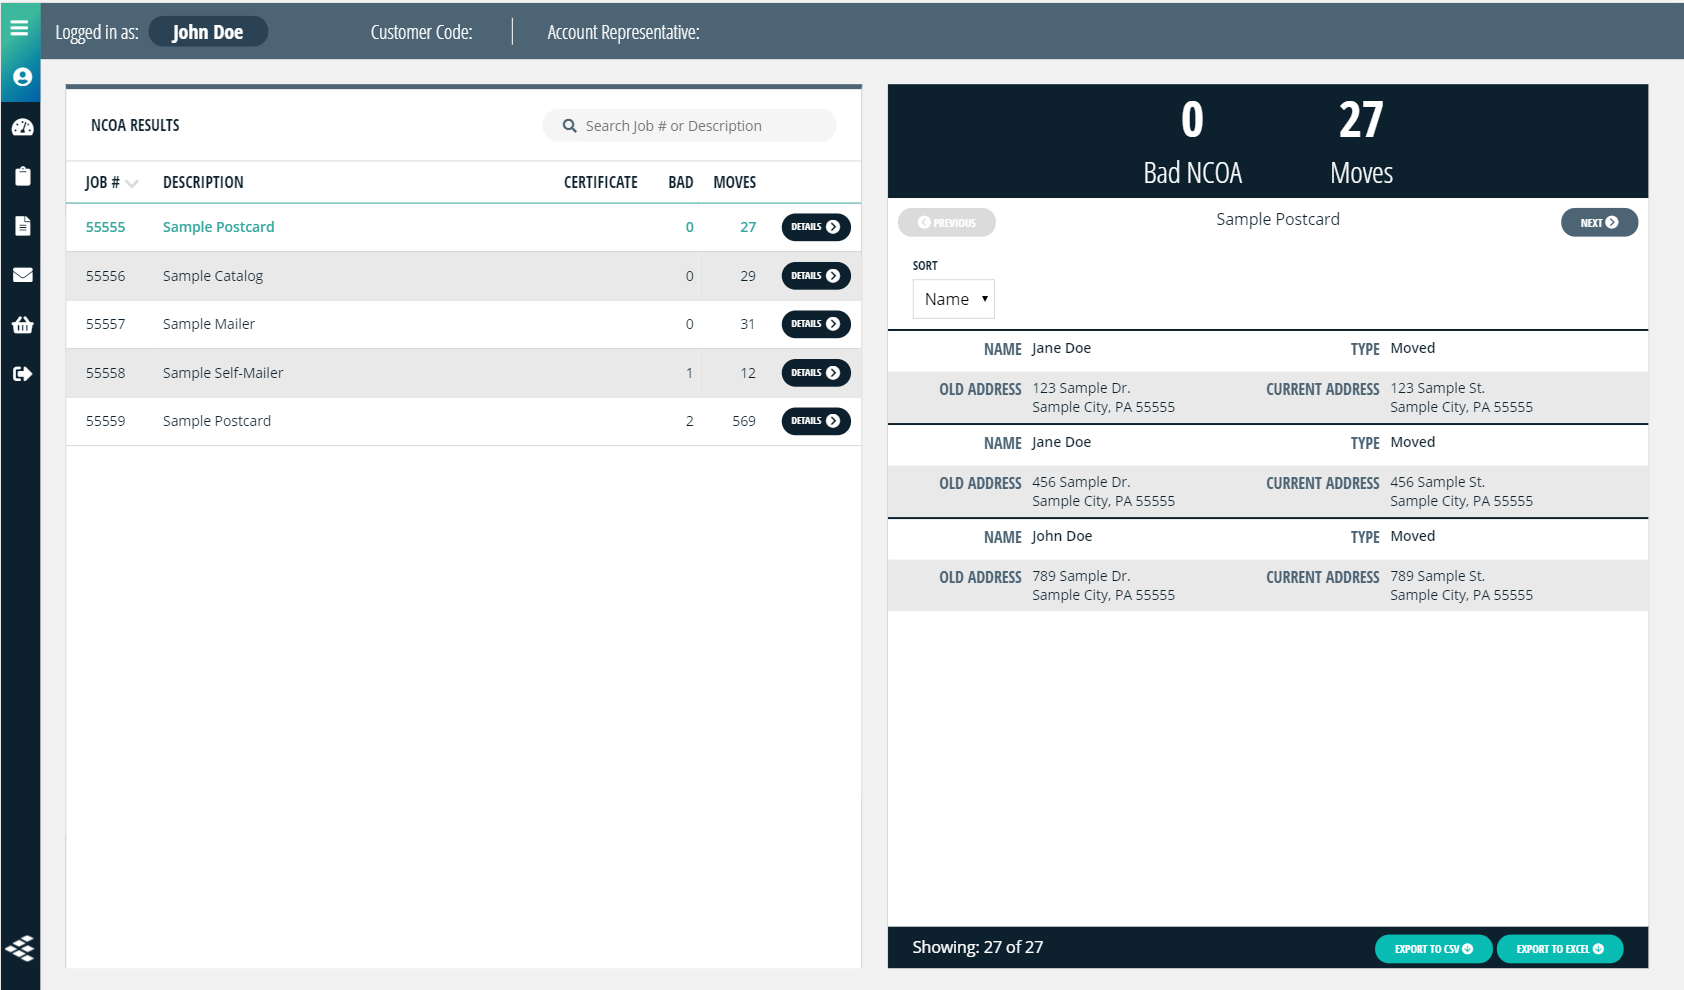
You can download the NCOA results by clicking the Export To CSV or Export To Excel options at the bottom of the right details panel.
Mail Management - SmartCertified
The SmartCertified page can be accessed by clicking the SmartCertified link beneath the Mail Management navigation.
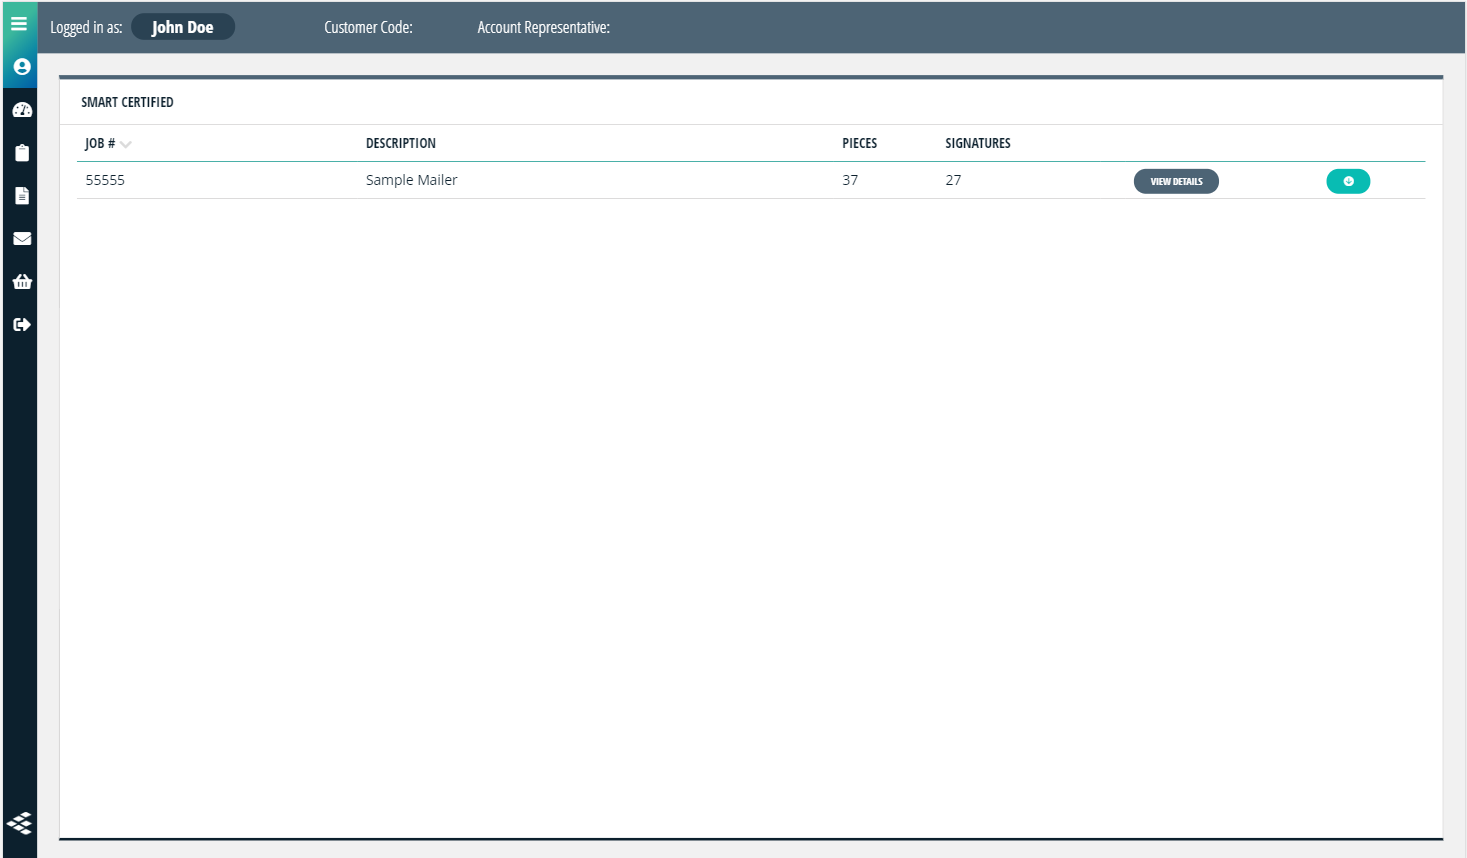
The SmartCertified page shows your mailing data with an overview of how many pieces have been signed from the number of total pieces in the job.
You can view and download the return receipts (with signature) by clicking the View Details button to the far right of the job and description.
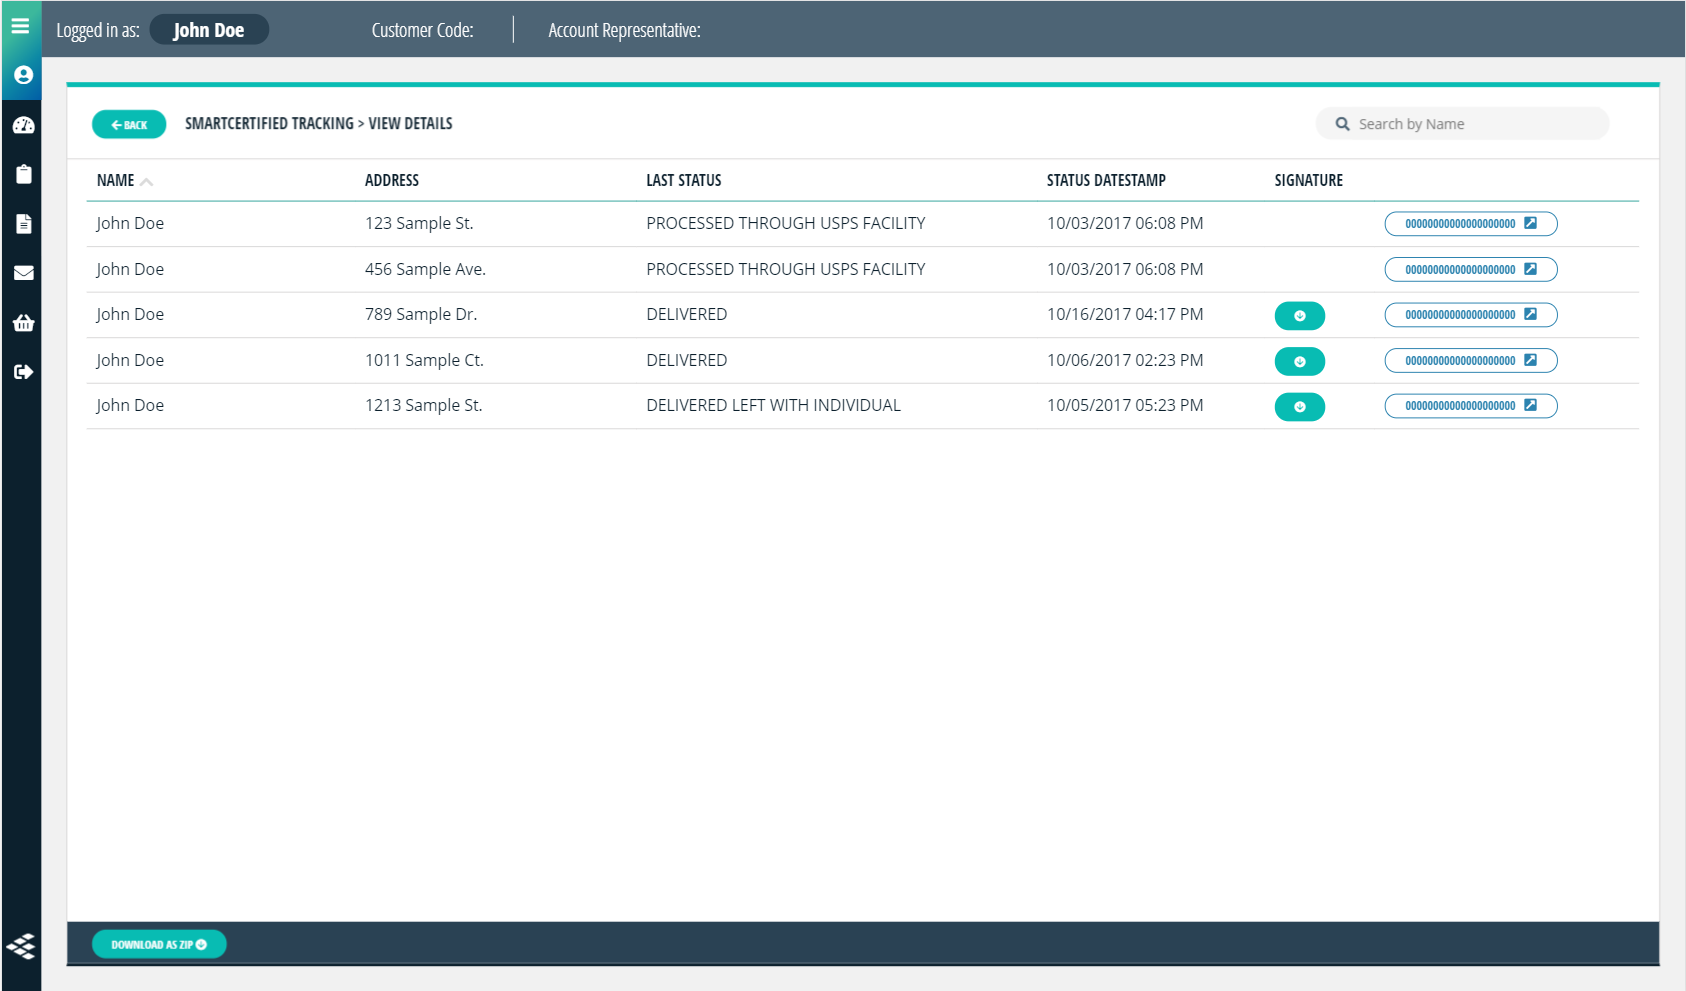
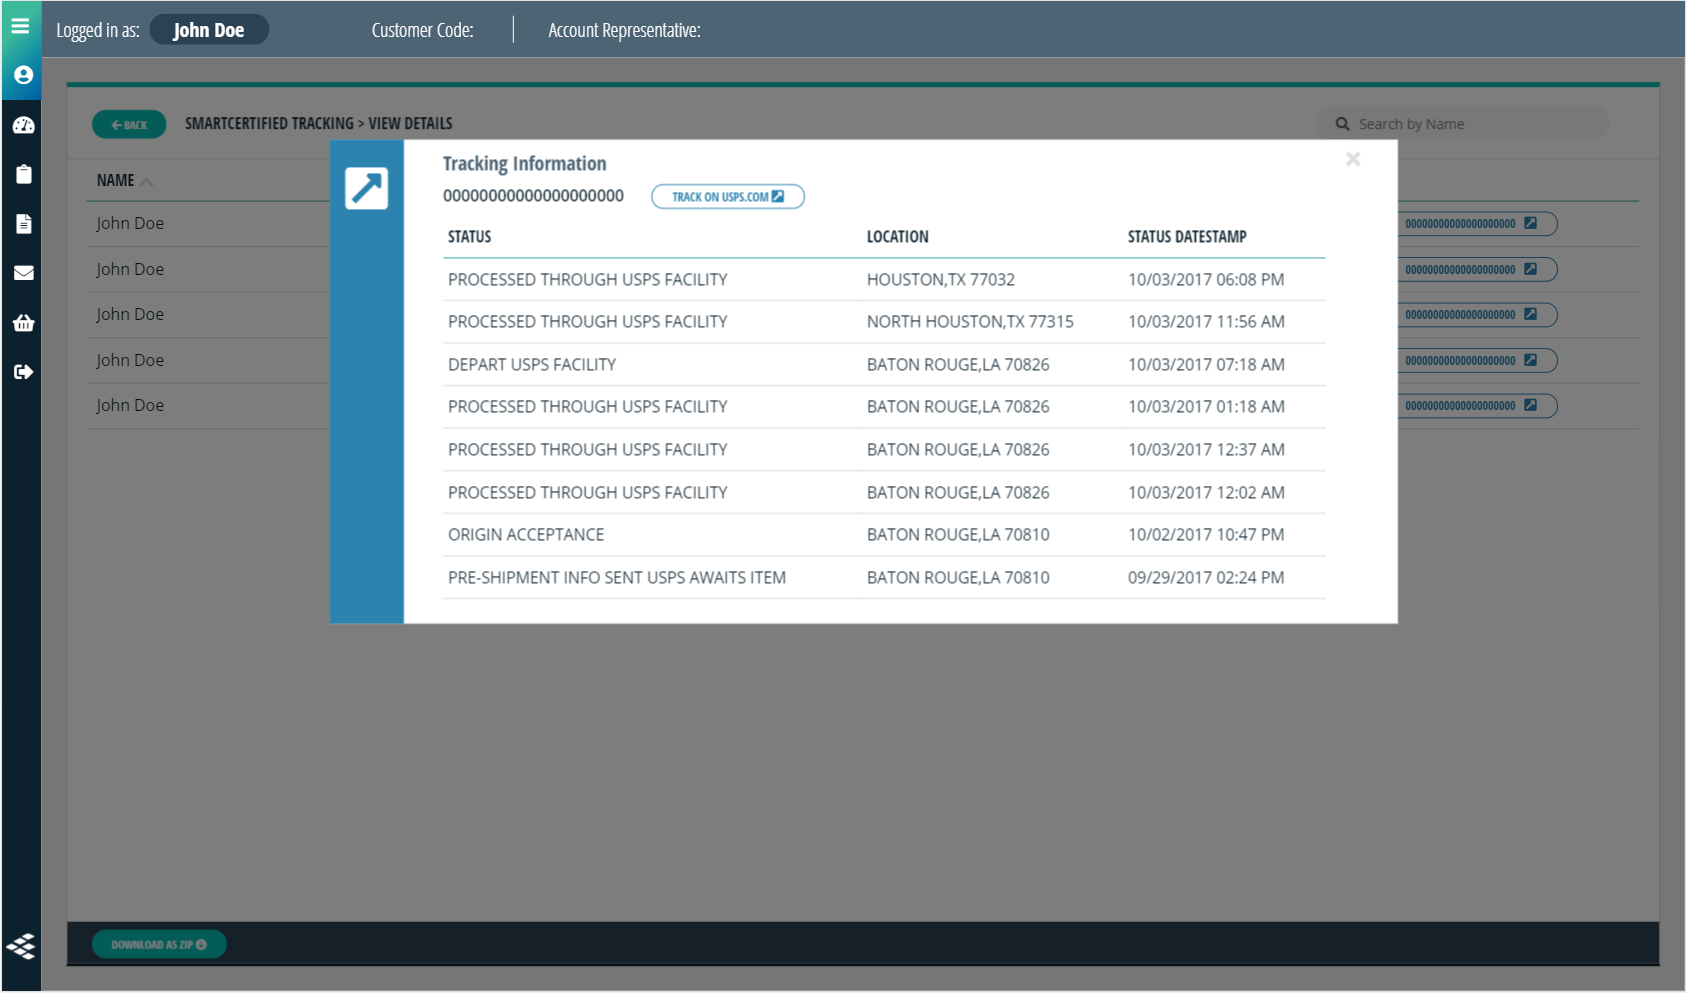
On the View Details page, you can download each individual signature or track the mailing piece by clicking the blue tracking number.
Emporium - Online Ordering
If you are a user of our online ordering system, Emporium, it can be accessed by clicking the Emporium on the main navigation. If you are not an Emporium user but are interested in learning more contact your Sales Executive or Project Manager.
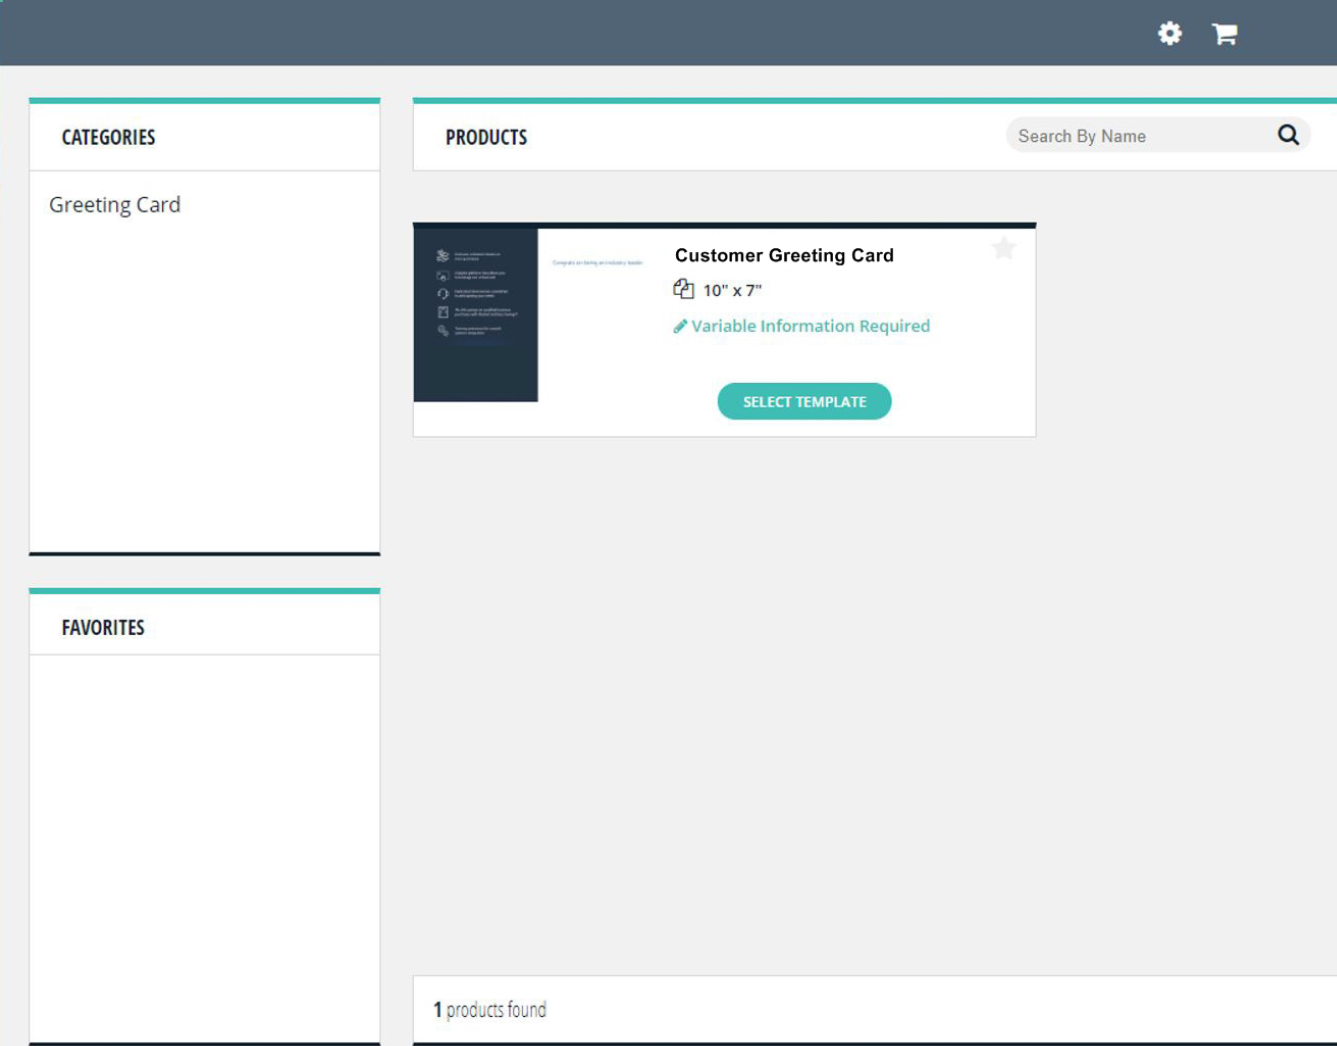
The Emporium storefront displays every product available for ordering. Start by clicking Select Template on the item you'd like to order.
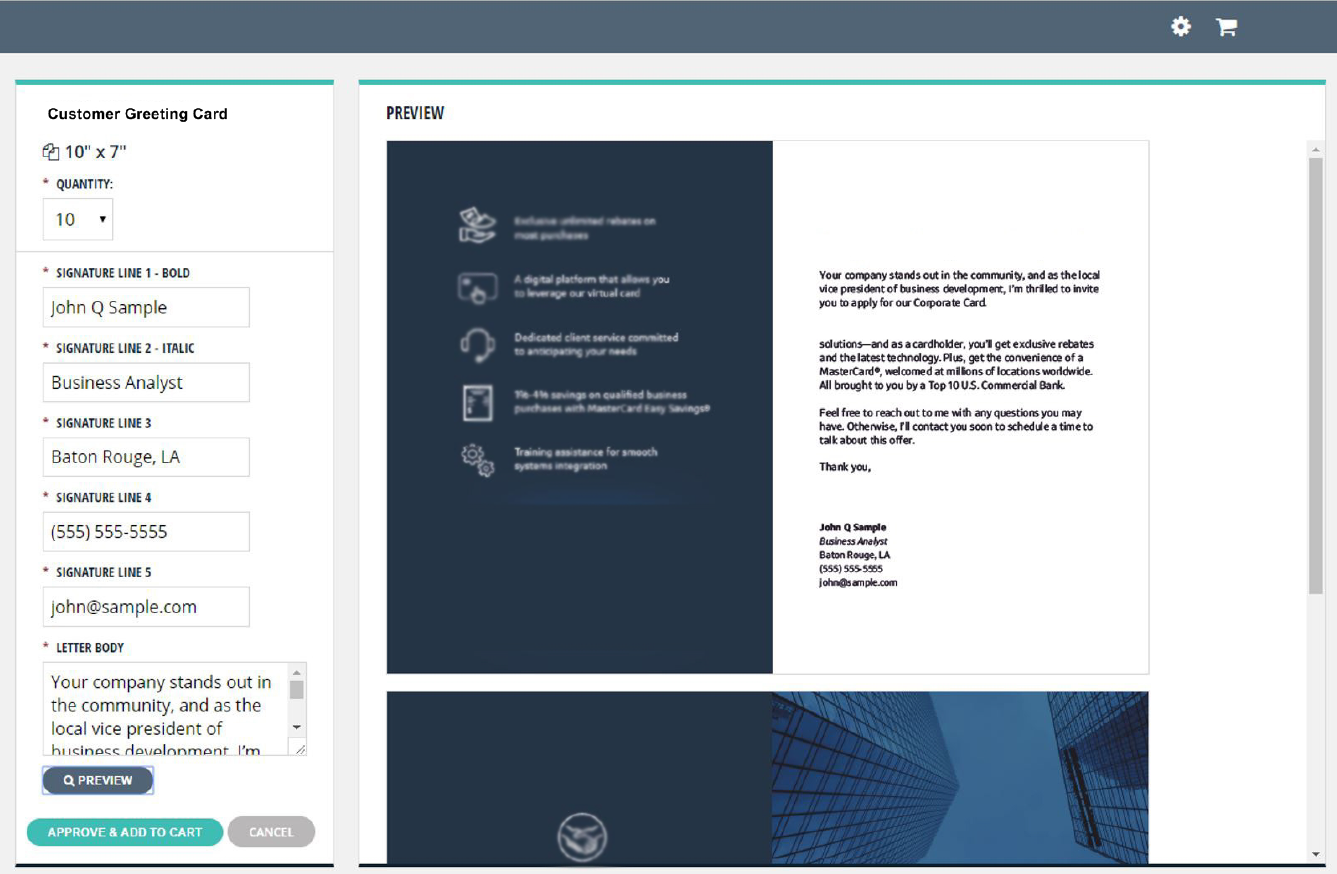
On the template's product screen, fill out the quantity and any required variable data fields.
You are required to click preview after each change.
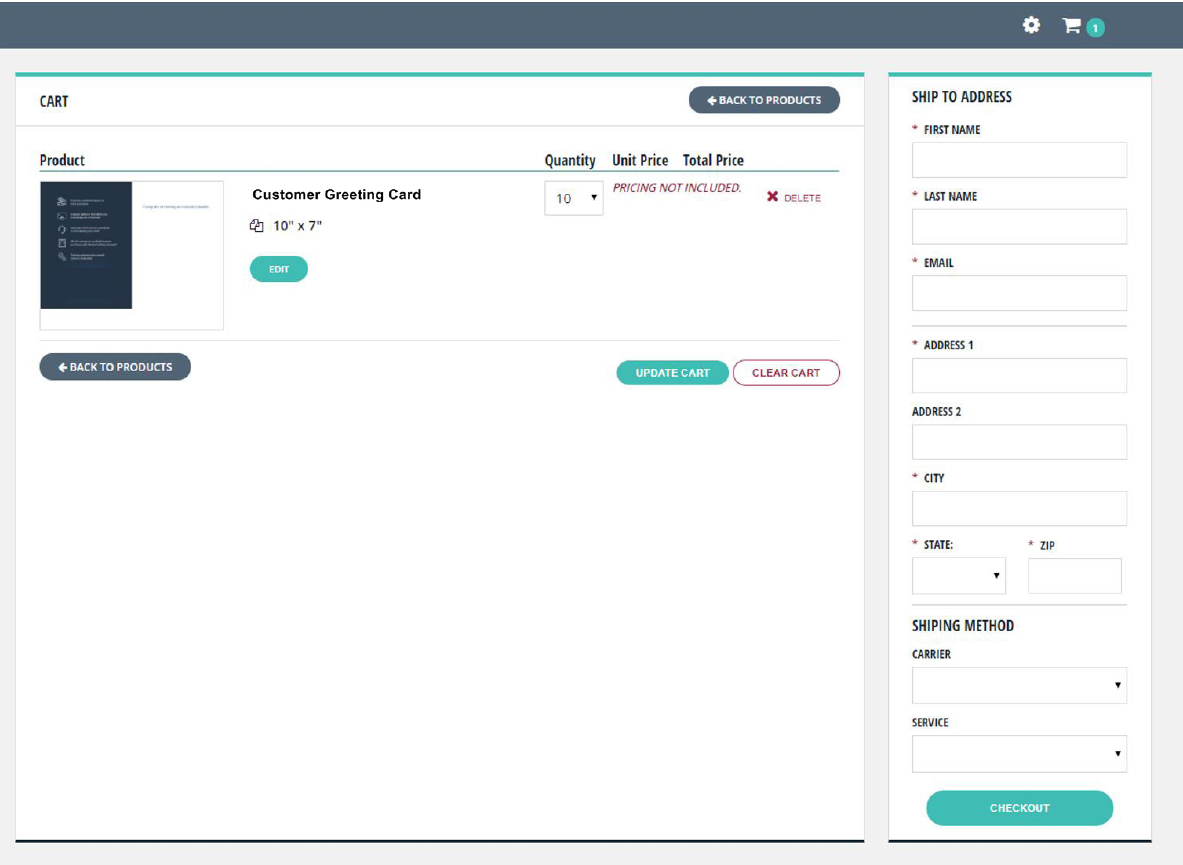
Once you are satisfied with the preview, add it to your cart by clicking Approve & Add To Cart.
The number of items currently in your cart will show up in the upper right-hand side of the page.

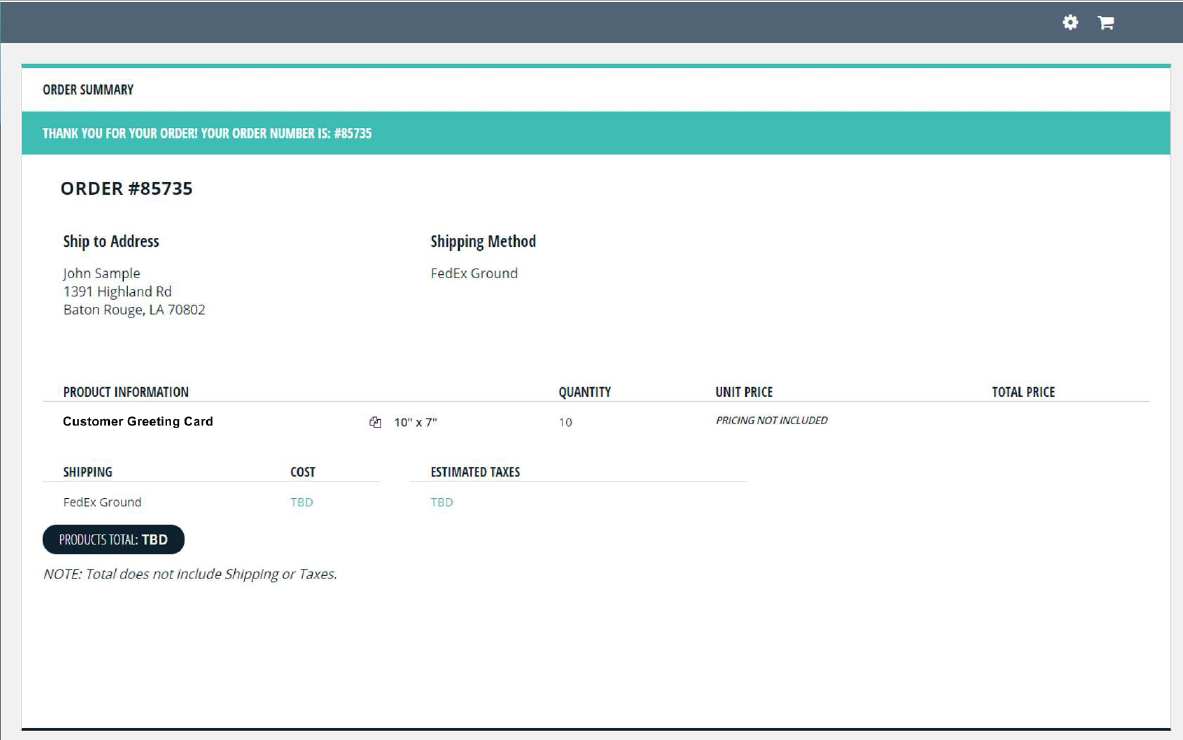
Click on the icon in the upper right-hand side to go to your cart to checkout. Fill out the required shipping information and proceed to the order summary by clicking Checkout.
On the Order Summary page, you can make any last minute changes and click Place Order when you are ready to submit it.
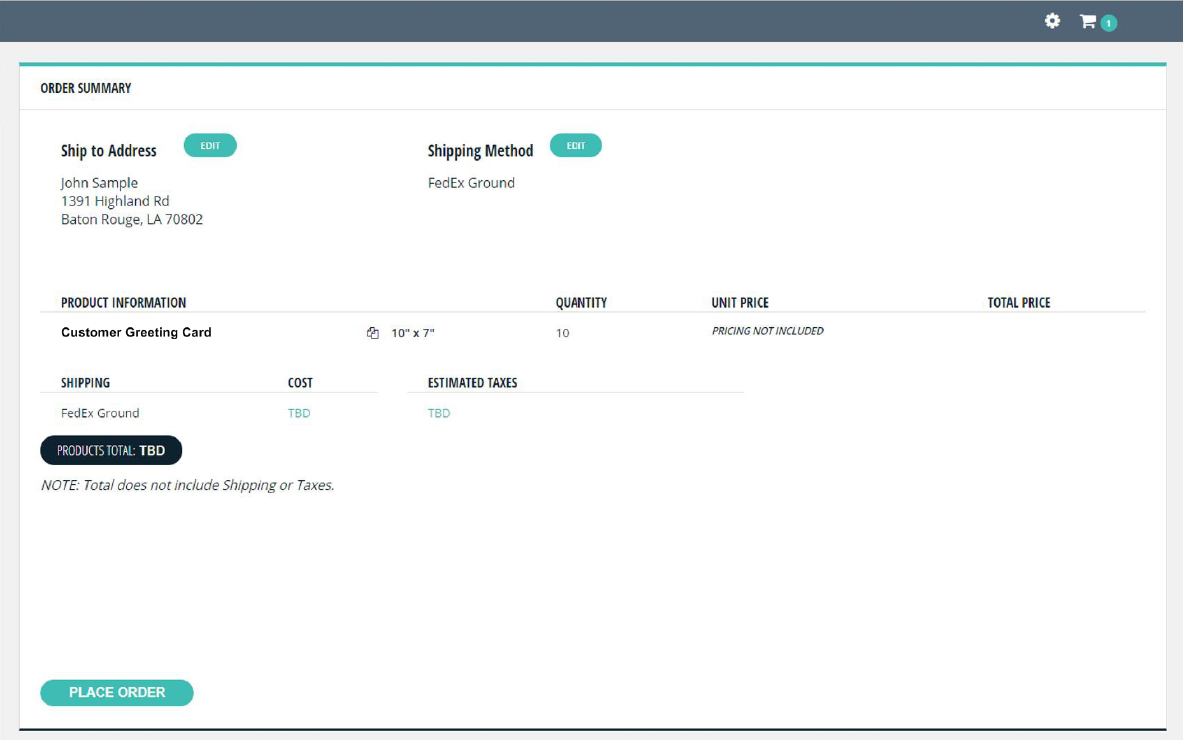
Once the order is submitted, a confirmation email will be sent to the provided email address.